Friday, March 28, 2014

The Golden Find - "Francis Drake"


Francis Drake had a very interesting genesis. Australian designer Peter Hawes, M.D. (the M.D. one assumes, stands for Master Designer) read a book in the "Seafarers" Time Life series called The Spanish Main and immediately became fascinated with the subject matter. He then set about designing a game that would encapsulate this interesting theme.

In order to raise the bread and procure the supplies required to fuel an expedition to the Caribbean, Drake really had to bust some major ass. This is nicely represented by the Plymouth Street portion of the game where participants compete for key acquisitions like Crew, Cannons, Supplies, and Ship Upgrades. During this stage you can also enlist help from the Queen, the Admiral, the Governor, the Informer and even the Mac Daddy himself. All of these high-profile peeps give you an opportunity to screw around with the game's rules.

More examples of thematic relevance abound. You can procure a Pinnace, which can be used to avoid eating the Spaniard's cannon bawlz by sneaking in through their back doors (*a-hem*). Also, Drake benefitted considerably from a friendship with the eccentric one-percenter Sir Christopher Hatton who helped curry favor ("MmmMmm, curry... flavor.") from the Queen. Drake was so grateful to Hatton that he re-christened his flagship The Golden Hind to pay homage to the female deer depicted on his sponsor's coat-of-arms. In the game, the Ol' Heinie is a Location Tile which gives the backer the initiative when attacking Spanish targets or tackling trade missions.

The reason I'm mentioning this right off the bat is to show just how committed Hawes was in reproducing the subject matter's theme within the boundary of an abstracted Euro-sytle board game.

Here's the game's overview right from the official website:

"Return to a bustling Plymouth Harbor in 1572 as an aspiring Elizabethan captain making preparations for three exciting voyages to the Spanish Main in search of fame and fortune! As captains, players will have to plan their missions and provision their ships accordingly.

"Francis Drake is a race to see who can set sail and reach the Spanish Main first. The riches of the Aztec and Inca Empires await these swashbuckling captains. Many tough decisions must be made before each voyage:
  • How many crew members, guns and trade goods will be needed?
  • What supplies will be needed to reach deep into the Caribbean?
  • Will a stronger galleon be needed to attack the treasure fleets?
  • Can special charts from the Spanish Admiral and Governor help?
  • Will the Queen or rich investors back the voyage?
  • What information can the informer give?
  • Will Drake himself be available to guide the voyage?
  • Who will get the use of the Golden Hind?
"Each new voyage has its own challenges to overcome, but the captured gold, silver and jewels should greatly please the Queen. Get ready for the voyage of a lifetime!"

Still seeking the New World of enlightenment? Then point your 'lectronic astrolabe towards the following link and prepare to set sail!

***

SHIPS / COLORS 

Andrew...the Pelican (Red)
Chad...the Pasha (Orange)
Me...the Elizabeth (Blue)
Jonathan...the Swan (Green)


1572

PROVISIONING PHASE

Right away I was intent on scoring a Commodity set as soon as I could. I dropped my first Player Disc on a double-Gun space, picked up two Crew, and then snagged a respectable surplus of bonus resources at the Tavern. Then I jumped ahead for three Supply Barrels, giving me free reign over three-quarters of the Caribbean. I finished up by snaring a pair of Trade Goods, upgrading my ship to a Galleon with a bonus Gun and then I picked up some insurance Crew Dockside just before casting off.

After snatching up the first double Gun Location, Jon gave himself the run of the entire region by plopping a Player Disc down on a four-Barrel Supply space. Next up he followed me into the Tavern with pretty comparable results. He added to this by stealing The Golden Hind and making nice with the Informer. Not only did this last score net him a single Trade Good he gained the power to study the secret defenses of Forts or Galleons before attacking them or take a look at a single stack of Mission Discs and swap the order of any two. Jon augmented this slippery little gent with a last minute Frigate-to-Galleon conversion and another Gun purchased Dockside.

Chad played very frugally, placing Player Discs on each on the first three Locations, scoring two Supplies and a total of three Guns in the process. Picking up on his staffing issues, he was forced to leap-frog in order to pick up a total of four Crew from two more sites. Sensing the importance of certain personages, he also popped in on the Governor. Schmoozing with this dude let him distribute the four Spanish Troop counters anywhere he wanted and get a Victory Point for every Silver Piece left on the board at the end of the Sailing Phase. He then picked up a Pinnace to aid in any future amphibious assaults but then took a four-Victory-Point setback in order to pull off a last-minute ship upgrade. Finally he chucked some more goods into his hold Dockside before shoving off.

Andrew slipped it to the Queen, who, in return, upgraded his Frigate to a single-Gun Galleon pre-loaded with a Trade Good. The randy (and apparently undiscriminating) l'il bugger then mounted Francis Drake himself, earning a metric shit-ton of Crew and Guns over the course of two rounds. After procuring two Barrels worth of Supplies he then went aboard the Admiral, who re-arranged the three Spanish Galleons to his advantage. This also gave him a chance to make away with one Victory Point for every remaining Gold that went unclaimed. He then ended the phase by picking up a second Trade Good.

SAILING PHASE

Mission One

Andrew was the first to set sail, taking out a Spanish Galleon in Mar del Nort for six Victory Points and a Jewel. I used my priority-one Mission Disc to set sail for the San Juan Trade Port and secure the hella-rare Indigo there. Chad got Andrew's sloppy seconds in Mar del Nort, and although his opponent had already "Yoinked!" the Jewel, he still collected six Victory Points. Next Jonathan took a dart over to Santiago de Cuba to pick up a shipment of Coffee.

Mission Two

Cursing my entrepreneurial initiative, Andrew had to settle for Tobacco in San Juan. I felt like weeping when my late-to-the-party Mission Disc in Mar del Nort turned up nothing but bobbing wreckage. Chad went after the Spanish Galleon patrolling the waters up north but Jonathan revealed The Golden Hind and snatched the Jewel right out of his grasp! Despite the contention, both of them took home four Victory Points apiece. Finally, Jonathan realized that he'd over-extended himself and aborted his attack on Gran Grenada, passing up two Victory Points and a Gold!

Mission Three

Andrew had Santo Domingo Trade Port all to himself so he picked up an uncontested Sugar. By the time I rolled up on Gran Grenada Jon had already made off with the Gold so I had to settle for two measly Victory Points. After jamming his Pinnace in Fort Havana (!), Chad made off with four Victory Points and a Gold. Once again, Jonathan was forced to preserve his meagre Guns and Crew and cancel his attack on Campeche, missing a chance to snare a Victory Point and another Gold nugget. Ouch!

Mission Four

Overcoming the Fort in Cartagena, Andrew scored six Victory Points and a big ol' pile of Silvah. Continuing my quest to be the first kid on the block to collect a set of Commodities, I sailed into Santiago de Cuba and fulfilled by sweetest Homer Simpson fever-dreams. Without any rivals, Chad completed the Conquests trilogy by subjugating the town in Puerto Cabello for a single Victory Point and some Silver. Finally Jonathan used his limitless mobility to follow through on his reserve Mission. By sacrificing a Gun and three (!) Crew, he took out the Fort in Veracruz for five Victory points and a Gold.  


1577

PROVISIONING PHASE

With most of my Commodities set collection heavy lifting complete, I decided to turn my attention towards accomplishing every type of Conquest. For that I'd need a lot of Crew and Guns, so I made haste to the Tavern, where I scored the highest possible result and made off like a bandito. Seeing how well Andrew benefited from the eponymous Drake, I decided to give him a spin this time out. By the time my obligatory two rounds with him were over, I proceeded to nail the Queen who rewarded my aptitude with a one-Gun Galleon and a Trade Good. Finally I picked up some Supplies, invested in a Pinnace landing craft and then improved my range with some last-minute Supplies before marching up the gang-plank.

Rather then scramble for supplies at the last second, Chad tried to get all of his Drakes in a row (heh, geddit?) by popping into the Tavern. Unfortunately he didn't roll as well as I did, precipitating two more runs fo' Guns (for a total of three) and a placement for two more Crew. He also pimped out his Frigate at the Shipyard, made two trips to score enough Supplies to access the first three sea zones and then finished up with an eleventh-hour Dockside shopping trip for a spare Crew.

Keen to score some of that sweet, sweet Indigo, Andrew made a move to secure two Trade Goods. Since the Admiral worked so well for him last time out, he was quick to tap that resource again. He followed this up by taking the primary Shipyard slot, which gained him a pre-armed Galleon. Andrew then preceded to shanghai two Crew, hog the three-Barrel Supply space, nab the first Pinnace option and monopolize the Governor's time. After spending two valuable actions courting V.I.P.'s, Andrew became paranoid that he didn't have the resources needed to pull off his ambitious plans. As such, he bit the -4 Victory Point bullet and evoked the powerful once-per-game Investor.

Jonathan kicked off this Phase by capturing the first two-Gun Location space and then the one-Trade Good slot. By the time everyone else placed something, a lot of the more-attractive first-tier options were gone, forcing him to step up to the four-Barrel Supply Location. Once again, Jonathan had free reign over the entire region! He followed this up by capturing a two-point Gun space and once again securing The Golden Hind. Making up for lost ground he also picked up two Crew, triggered the Investor for -4 Victory Points and went Dockside for a spare resource.

SAILING PHASE

Mission One

Jonathan revealed his Hind-quarters, getting the top pick of Commodities in the San Juan Trade Port. By some miracle, this wasn't Indigo so Andrew completed his precious Commodities set. I used the Informer to pull my Mission One Disc out of the five-Cannon scrap in Mar del Nort and then used it to trump Chad in the battle against the Spanish Galleon off the East Coast of Florida. I grabbed four Victory Points and a precious Jewel while Chad collected the four-Veep consolation prize. Unopposed, Jonathan had the pick of any Commodity in Santo Domingo. 

Mission Two

Since he was the only person to play a Disc in Santiago De Cuba, Andrew's Commodity set was nearly complete. I used my Pinnace to sneak by Chad again in Panama, making off with three Victory Points and a valuable Silver. Once again, poor Chad was left with nothing but my Victory Point table scraps. Meanwhile, Jonathan exploited his ability to sail to the far end of the map, landing in Campeche for a Victory Point and a single Gold nuglet.

Mission Three

Andrew managed to elbow his way past Chad, defeat the two Cannons and two Troops and subjugate the Fort in Cartegena for six Victory Points and yet another Silver. Combined with Mission One's bait n' switch, my distribution during this Sailing Phase worked out perfectly. As the sole invader of Gran Granada I snapped up two more Victory points and another Jewel. Exploiting the full extent of his Supply-line, Jon tangled with the Spanish Galleon patrolling around in the Golfo de Mexico, which made him pay through the nose with its three revealed Guns. 

Mission Four

After getting edged out in the northern skirmish, Andrew was on the verge of pushing me to the floor and jamming all of the game's glass beads up my nose. I completed this deft turn but revealing my Mission Four Disc in San Juan. Since I'd already paid my dues to collect the rarer Commodities, coming in last really didn't matter since I could use any of the leftovers. In spite of a nasty three-Troop and one-Gun surprise in Veracruz, Jonathan prevailed, netting five Victory Points and a Gold bar. Finally, as the runner up in Cartagena, Chad helped himself to six Victory Points.  

   
1585

PROVISIONING PHASE

After press-ganging two Crew, Jonathan passed up five intervening locations before investing again in two Trade Goods. Then, after procuring two Guns, getting cozy with the Admiral and filling his cargo hold with two Supplies he took a dart down to the Tavern where he rolled a reasonable "4". On his two remaining placements he grabbed another Supply Barrel and then did some last minute wheeling and dealing at Dockside before weighing anchor. 

On his turn Andrew was all over the Queen and the Governor like a cheap doublet. He then snatched up a single Trade Good and a whopping four Supplies. This time it was A-Dawg's turn to have full run of the yard! To further his schemes he went after a Pinnace pre-stocked with one Crew, chucked a measly "1" at the Tavern, wrestled The Golden Hind away from Jonathan and then picked up additional goodies Dockside. 

Still intent on completing another Conquests hat-trick, I made a bee-line for the Shipyard where I upgraded my vessel to a Galleon. Although she came standard issue with one Gun, I quickly decided to ramp up the firepower with two more. Once again I scored Drake as well as the very same Informant that served me so well in the previous expedition. Extra bonus: my shady little friend also provided the one and only Trade Good I'd need to finish my Commodities collection. I continued my leisurely stroll down Plymouth Street, requisitioning three Supplies and some extra stuff Dockside. At the end of this Phase I suddenly noticed that I'd only managed to place seven Player Discs. Would it be enough? 

Even though Chad was leading with in-game Victory Points, he'd yet to complete a set of Trade Goods and always seemed to be a step behind. Since he'd gotten caught with his pantaloons down last time, he went to the Shipyard right away this time out. Hastily he tricked out his sweet new ride with a total of three Guns and two Crew. Then, after missing out on four consecutive Locations, he bought a Pinnace and three Supplies, one of which he acquired Dockside. 

SAILING PHASE

Mission One

I still needed to get some Coffee to go with my Sugar so I made a trip to the Santo Domingo Trade Port priority one. Inexplicably, Andrew placed the Golden Hind in San Juan, even though there were three Destination Spaces there. Even after taking the initiative, he let Jon have the Indigo to complete his own set inspiring the unspoken question: 'Who is this non-pricky player and what have you done with Andrew?' For his regular Mission One Disc, Andrew beat me to the punch in the north sea, overcoming a two-Gun Spanish Galleon and claiming both the four Victory Points reward and the Jewel. Even though Chad was left to his own devices, he got curb-stomped by the Spanish Galleon in the Mar del Nort.

Mission Two

With my cargo hold chock-a-block with supplies, a complete dearth of competition and only one lonely Troop to contend with, my attack on Gran Grenada was a breeze. This earned me two Victory Points and another precious Gold. Andrew also had no-one to contend with in Santiago de Cuba and added yet another Commodity to his stockpile of goods. Chad edged out Jonathan for dominance of the Fort in Panama, making off with three Veeps and a giant hunk o' Silver. Nonplussed, Jonathan returned the favor in Cartagena, capturing the Fort there for six Victory Points and another bonus Silver. Having said that, the two Guns and three defending Troops stationed there really made him pay for it.  

Mission Three

Even though I didn't capture the Jewel from the skirmish up north, I was quite content just to score the four Victory Points. Like an Elizabethan Hulk Hogan, Chad ran wild all over Puerto Cabello, picking up an easy Victory Point and some Silver. Meanwhile, Jonathan acquired Tobacco in Santo Domingo, completing a Commodities set right at the last second. 

As a side note I have no idea what Andrew did on this turn since he apparently jammed his third Mission Disc up his urethra the split second the game was over. 

Mission Four

With Andrew in control of the Governor, I knew that I was in for a nasty fight in Havana. Fortunately I had a huge surplus of both Guns and Crew so I managed to overcome the two Spanish artillery and three Troops to collect four Victory Points and a Gold. Needless to say, Andrew made things a lot easier for himself in Veracruz where the Fort's single Gun and two Troops proved to be a push-over. This rewarded him with five Victory Points and a Gold as well. As runner-ups to one another, Chad and Jon collected six and three Victory Points respectively from Cartagena and Panama.


END OF GAME VICTORY POINT STANDING
    
Me...39 Points
Jonathan...37 Points
Chad...34 Points
Andrew...23 Points

FINAL VOYAGE SCORING

Chad...10 Points
Me...10 Points
Andrew...1 Point
Jonathan...1 Point

COMMODITY SETS

Andrew...34 Points
Me...28 Points
Jonathan...26 Points
Chad...0 Points

TREASURE CHEST

Andrew...30 Points
Chad...30 Points
Me...29 Points
Jonathan...25 Points

FINAL SCORES

Andrew...88 Points


Jonathan...89 Points


Chad...94 Points


Me...104 Points


I WIN!

***
REVIEW

PROS
  • Aesthetically speaking, the game is just gorgeous. The board looks like an olde skool navigation chart and both the Ship Logs and Plymouth Harbor board evoke shades of Elizabethan naval art. This stellar imagery is also applied to the handsome Location and Commodity tiles. In a lesser game, the Supply Barrels, Ships and Treasures would be boring, nondescript hunks of wood, but instead we get some awesome-looking sculpted plastic figures and purdy glass beads. This kind of makes me wonder why cubes were used for Guns, Crew and ship range while discs were employed for actions and Missions. Eurogame street cred? Production cost savings? Whatever the reason, the game is still an absolutely pleasure to stare at for hours on end.
  • Since you only get to deploy one Player Disc at a time during the Provisioning Phase, you aren't sitting around waiting for your turn to come around again like the vernal freakin' equinox. The Sailing Phase is equally arresting, with each participant's primary discs resolving first before you move on to Mission Two.
  • Since there are only three rounds, you can probably play two games into one sitting.
  • Taking a stroll down Plymouth Street involves a fair amount of strategy. Do you want to use the Admiral and / or Governor to save on resources and make your moves surgical? Or do you want to load up on basic Guns and Crew in order to remain flexible during the Sailing Phase? If all you want to do is collect Commodities this turn, how many Supplies will you really need? Or do you want to take on a bunch of Barrels, strike out to the far end of the board and avoid direct competition? Do I chill wif my boy Drake or do he soak up too much time? Should I tap the Investor for a quick boost or avoid his -4 Veep penalty like the plague?
  • Even after players head out to sea, things stay frosty. Since actions are resolved in Mission Disc order you really need to decide what you need to do versus what you could do. Even when you place a Mission Two Disc on a key Destination, you can still get squeezed out, just like I did in 1572. Conversely, if only one of three Trade Port Destination spaces have been claimed towards the end of the Sailing Phase you might be able to score a "Hail Mary" Commodity with a Johnny-come-lately Mission Four Disc.  
  • The game constantly forces you to decide between going after high profile Conquests or avoiding competition via low Victory Point objectives. After getting burned in that first year, I decided to switch to the latter and the resulting Treasure that rolled in really helped me storm back. In the end, Andrew's aggro style seemed to case more harm then good. 
  • The Golden Hind, Ghost Ship and the Informant all serve to throw a monkey wrench in the Sailing Phase, making things tense even after the Mission Discs have been revealed. My ability to pull out of what surely would have been a nasty and expensive fight and then use the same disc to edge out Andrew in the northern Spanish Galleon scrap was a major coup for me. 
  • A balanced approach appears to be optimal. IMHO, the twenty-eight Victory Points awarded for a full set of Commodities is just too lucrative to ignore. Even after all my early headway, I still didn't complete my collection until the game's final year. As a side note, even though Chad did quite well capturing high-Victory Point objectives and nabbing Treasure, his failure to pick up any Commodities really hurt him in the end. 
  • Since you concealing yer booty (I.E. Gold, Silver and Jewels) the final victor always in doubt. Bonus points for the pimp-tastic Treasure Chest. 
  • Some people might grouse about nothing you do in the first year carries over to subsequent years, but thematically, I think this makes sense. These are supposed to be separate voyages spanning several decades, after all. Historically speaking, Drake himself was faced with a complete and total reboot every time he ventured out on a new expedition.
  • For what amounts to a worker-placement Euro, the theme is surprisingly strong. Yes, the art helps to sell things but more importantly, the Provisioning Phase actually feels like a panicked scramble to gather up those desperately-needed last minute resources before your investor's written-in-stone launch date arrives. Hmmmm, 'scuse me while I re-skin this game with a blockbuster movie-making theme.  
CONS

None worth mentioning. 
***
Francis Drake is pretty durned awesome. It clicked so well with me that I can definitely see adding this one to my own collection. This one definitely scores top marks!

***
Have a burning desire to hit the Tavern, flirt with a Queen, kick some Conquistador ass and fondle some Jewels? Then take a second to click on the image below to learn more about the Francis Drake board game and help fund this blog's next voyage!  

Friday, March 21, 2014

"You Get A Gold Star...In Mayhem" - "Dungeons & Dragons"


http://img2.wikia.nocookie.net/__cb20130313225201/starwars/images/4/43/Medals.png

At the end of every Dungeons & Dragons session I run, I like to give out a little extra somefin' somefin' out to my playaz.

In addition to doling out experience points for ganked monsters, defeated traps and/or solved riddles, I also fire off the following after-the-fact missive to all my participatory peeps:

"Lookin' to throw in yer two copper pieces RE: who was the 'Group MVP' and 'Best Role-Player' for our latest session? Message yer vote to me now! Remember...if you don't vote you can't bitch about who won!"

So, what exactly is this "Group MVP" and "Best Role-Player" thang I speak of?

Group MVP:  Fifty (50) bonus Experience Points are awarded to the player who kicked the most ass, cooked up the best schemes, answered the most riddles, solved the most problems and generally went above and beyond the pale to advance the game's progress.

Best Role-Player: Fifty (50) bonus Experience Points are awarded to the player who did the best job evoking a believable character. By displaying distinct mannerisms, unique voices, kooky accents, habitual behaviors, odd peccadilloes, alignment adherence and/or consistent attitudes players have a chance to net this particular Kewpie doll.

So, my Pee-C's send their nominations back to me, one person per category. If you want, you can vote for the same dude/dude-ette for both rewards but you can't vote for yourself. That would just be lame.

When the responses come back I tally 'em all up and then hand 'em out at the start of the next session, always to a genuine chorus of cheers and "Huzzahs!". If there's a tie between several players, the points are split evenly.

Even though this isn't a huge amount of XP, these humble l'il gifts tend to encourage three things:
  • Players tend to remain a lot more focused and "in the moment" during sessions. 
  • There's a lot more humor and the yuks are more likely to be related to in-game shenanigans.
  • It tends to keep our four-hour sessions moving along at a realy brisk pace.  
Please note: I tagged this posts as relating specifically to D&D but it goes without saying that a similar system can be applied to any role-playing game.  


Friday, March 7, 2014

♪♫ "War L-i-i-i-ke An Egyp-tian" ♪♫ - "Kemet"

Ages ago I had a chance to play Cyclades and I liked it so much that I had to physically restrain myself from rushing out right away to buy it. My collection has gotten so out of hand lately that I gotta play these expensive / physically huge games a coupla times in order to get past the honeymoon period. If it lingers with me and I catch myself molesting every single copy I come across in a retail store, then I know that I should probably pull the trigger on it.

For me, Cyclades managed to scratch that light wargamey / civ angle but with an extra dollop of Clash of the Titans on top. I really liked roping these powerful creatures into servitude for a short period of time, even if your sway over them was tenuous at best. 'Cuz, as you well know, the kraken ain't nobody's bitch.

Now, even though Kemet was designed by different people, both games were published by the same company and share a lot of the similar trappings. There are regular (and very squishy) ground troops, optimal areas to capture, limited resources,evolutionary upgrades, and a slew of legendary creatures which can be (hopefully) bend to your will. As a result, I expected Kemet to play just like Cyclades but with an Ancient Egyptian overlay.

Well, pinch my butt and call me Nefertiti, I was quite surprised to find out that the game is actually rather differently then its Grecian counterpart.


Here's how publisher Matagot brags up this spiffy-looking title:

"Incarnate a god in Ancient Egypt: maneuver your troops to defeat your enemies, control the best territories, and enter the legend thanks to your military victories!

"A game with the same epic feel as Cyclades, with a strong theme which will transport you to ancient times. Through battles and magic, be the finest of all the strategists!"

Looking to decipher the full wall of hieroglyphics? Then point yer Ankh at the following link and the wisdom of Thoth will be yours!

***

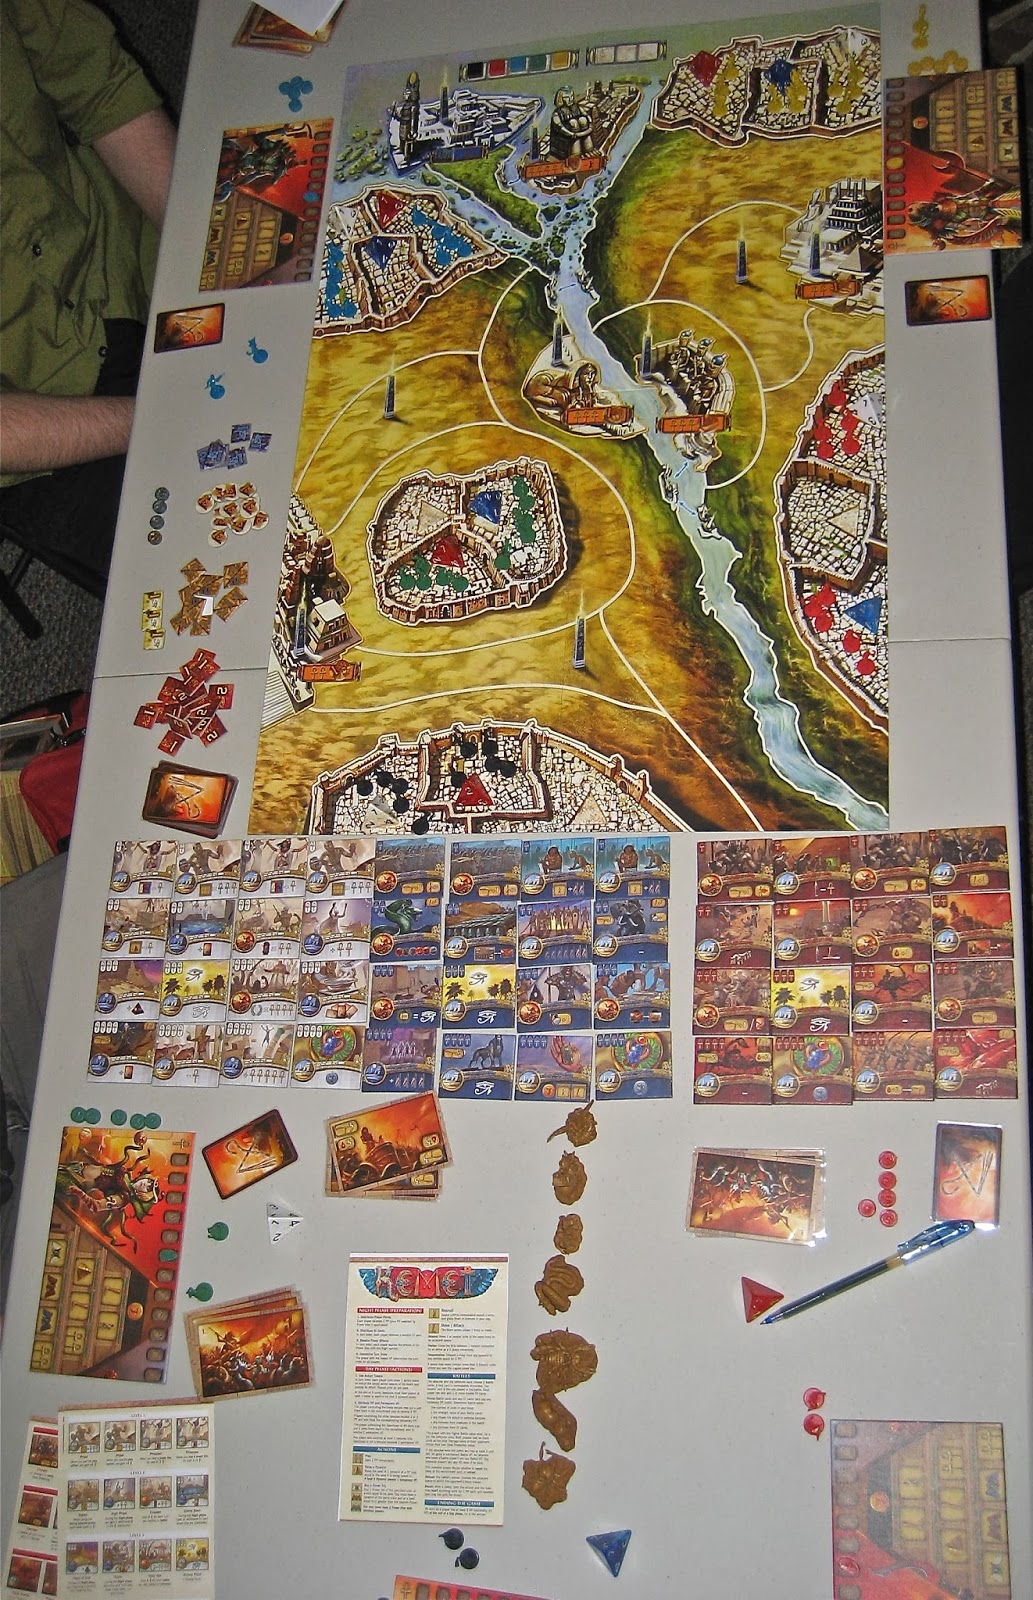
With Dean out for this week, we needed a new temporary home for the eight rabid gamers who were expected to show up. Since Kemet was Mike's pick it seemed apropos to gather in his expansive basement last Wednesday in order to to throw down. While Kris coached Matt and Jonathan through their first game of Agricola ("But I wanna play too!"), Andrew, Chad, Jeremy, Mike and I decided to get our Tutankhamun on.

COLORS / ROLES 
Andrew...Ouadjet (Green) 
Chad...Sobek (Blue)
Me...Anubis  (Red)
Jeremy...Bastet (Black)
Mike...Horus (Yellow) 


CYCLE ONE

Before the game began, Jeremy decided to place a Level One White Pyramid and a Level Two Red Pyramid, which he soon ramped up to Level Three. He then split his ten Units between these two Districts in his City. During that first Cycle he decided to teleport the Troops guarding his White Pyramid to the closest Temple which earned him a Temporary Victory Point and two Prayer Points, I.E. the all-important currency used to buy Power Tiles in the game. Right at the end of his turn Jeremy decided to spend a few of these spiritual shekels on a huge, dung-packin' Royal Scarab which gave him +2 to Troop Movement and +2 to Strength.  

According to the designer's own tactical advice "one of the most common ways to earn Victory Points is to win a fight as the attacker". I decided to thumb my nose at this and opt for a defensive strategy, at least initially. In doing so I hoped that my rivals would beat themselves up, allowing me to swoop in wherever I saw fit. Once again, a strategy that served me very well in my olde skool wargaming days would end up kicking me right in the amulets.  

During setup, I placed a Level Two Blue Pyramid and a Level One White Pyramid and then split my ten Units amongst these two Districts. My first priority was to invest in Pyramid improvement, cranking the Blue d4 up to Level Three. Then I turned my attention to Power Tile acquisition, the first of which gave me a Permanent Victory Point and another White Tile (the "Priestess") lowered the cost of all my future purchases by one. 

On the board I Teleported a Troop from the White Pyramid to the "Sanctuary Of All Gods" in the northwest. Just as I predicted, everyone else was preoccupied with sniffing each other's butts so my presence there was virtually ignored, giving me an opportunity to swipe another quick permanent Victory Point. 

Chad gambled and dropped all three of his Pyramids on the board at Level One, guarding the White and Red structures with five Units apiece. Eschewing any Pyramidal improvements, he decided instead to invest in a "Recruiting Scribe" which gave him two bonus Units, a "Priest" which blessed him a +1 Ankh bonus on Play Actions and "God Speed" which gave his Troops a +1 Movement Bonus.

So equipped he decided to pick a fight with Mike over the super-valuable northernmost Temple which gives its owner a whopping five Prayer Points plus a temporary Victory Point whenever you sacrifice a single Unit. In the resulting melee Mike was sent packing and Chad only lost a single dude. He also snapped up a veritable freebee: one of the mid-board Temples. Needless to say, this instantly caught Andrew's attention.
  
Like me, Andrew decided to specialize in a Level Two Blue Pyramid right from the get-go. Unlike me he wisely decided to augment this with a Level One Red structure for a little dash of offense. After placing five Units apiece in each District he then snatched up the Red Power Tile "Charge!" which instantly gave his Troops a +1 bonus in battle when attacking. More importantly, he went out for some Deep Desert Snakin' via a killer Level Two Blue Tile.

If Andrew could be accused to exploiting his superior knowledge of the game in order to get an edge over the rest of this, this last move could arguable be called "Exhibit A". Indeed, the Snake's ability to nullify the effect of rival creatures turned out to be pretty clutch. 

Andrew then went to work, driving Chad out of his mid-board Temple with an eleven Strength Troop!  Even though Chad was forced to slink away down south, the exchange wasn't particularly bloody and he only lost one Unit in the skirmish. After capturing the adjacent Temple, this gave Andrew a grand total of six bonus Prayer Points, two temporary Victory Points, and a Permanent Victory Point for holding on to two Temples at the end of the Cycle! 

Finally, Mike also placed all three of his Pyramids at Level One, guarded by three Units on Red, three on Blue and four on White. Over the course of the Cycle, he also acquired two basic Power Tiles: a "Priest" and a "Stargate", the latter of which decreased his Teleportation costs by one! Mike kept a pretty low profile on that first Round, securing the eastern Temple with three Units and bringing two reinforcements onto the board to guard the Blue Pyramid. 


CYCLE TWO

Andrew's momentum continued after he snagged the initiative away from us. This time he concentrated on home improvement, driving his Blue Pyramid up to Level Four. He managed to do this just ahead of me and steal away with the precious Sphinx! Not only did this give him an instant Victory Point, his newly-acquired titan would henceforth add two Strength Points to any Troop that fought along side it in battle!  

Despite these infrastructure improvements, Andrew found himself locked into a defensive posture. His acquisition of the Snake seemed to send Jeremy into a homicidal fit and Andrew was forced to shore up the defense of his Level Four Pyramid with the aforementioned Sphinx and five new Units. Later in the round Jeremy would make a point of denying Andrew a hold on two Temples. 

In preparation for his Holy War on Andrew, Jeremy jacked his Red Pyramid Level up to four. He then poured every single Prayer Point into acquiring new offensive weapons including the "Open Gates" Power Tile and the incredibly bad-ass "Giant Scorpion". This gave Jeremy everything he needed to waltz right past Andrew's defenses with an eleven-Strength Troop and deliver a pretty nasty serving of ass-beatery. This was definitely a battle of attrition what with Andrew losing three Units to Jeremy's two. In spite of his genocidal obsession, Jeremy kept the south-west temple well-garrisoned.  

I continued my measured approach, building my Blue Pyramid up to Level Four and scoring a Victory Point in the process. Still bitter over Andrew's blatant theft of my Snake, I had to settle for a consolation prize: the not-nearly-as-badass Ancestral Elephant. Admittedly, he was pretty cool since he added a point of Strength, Damage and Protection to any Troop he was embedded with! 

After levying two new Units to guard my White Pyramid, I decided to test-drive my new Oliphant by descending on the now-deserted Temple in the middle of the board, splitting both sides of the river with Andrew. Even though he's not particularly keen on sharing himself, Andrew began to ask me to disclose my current Victory Point total over and over again. By some miracle, I managed to hold on to the "Sanctuary Of All Gods, even after sacrificing two more Units and collecting yet another permanent Victory Point.

Meanwhile, Chad successfully increased his Red Pyramid to Level Two and purchased the "Carnage" Power Tile, giving his Troops a pivotal +1 Damage in battle. Armed with this schmancy new upgrade he went on a tear, and by "went on a tear" I mean that he got his ass kicked by Mike in the northern Temple and quickly crawled back to his City to regroup.

After dialing up his White Pyramid to Level Three, Mike purchased the "Hand of God" Power Tile, giving him the ability to raise one of his Pyramids by one Level during every Night Phase. He then proceeded to boot Chad out of the northern Temple, even after he was forced to lose two of his own valuable Units in the process. Largely unchallenged, Mike also had no problem holding on to the easternmost Temple. With a single Unit sacrifice up north, he managed to net a grand total of seven Prayer Points, two Temporary Victory points and one Permanent Victory Point! Not too shabby...


CYCLE THREE

After augmenting his Troops with the "Defense!" Power Tile, Andrew once again let slip the dogs o' war (the puppies of pandemonium?), winning a key battle against Jeremy with with the help of a ten-Strength Troop and A GIANT FUCKING SNAKE. Jeremy followed this up by instituting a ruthless pogrom against Andrew which left ol' King Hiss with virtually no Troop presence on the board by the end of the Cycle!    

By now my clearly-distasteful strategy of using peace and non-violence to quietly collect permanent Victory Points was starting to raise eyebrows (and hackles) around the table. The first person to come a-knockin' was Mike, but I managed to eke out a narrow victory with seven Strength to his six for the win. Unfortunately I didn't have enough dudes left to pay the sacrifice cost and collect a third Victory Point, so I decided to Recall what was left of my forces there.

Lamenting the fact that I didn't score a single measly Victory Points in my humble victory against Mike, I decided to add the "Defensive Victory" Power Tile to my repertoire. I then jacked up my White Pyramid to Level Two. In spite of these improvements it didn't prevent Jeremy from swooping in and taking my one remaining Temple away from me. Arsehole!  

In addition to wrestling control of this central Temple on the east side of the Nile away from me, Jeremy also kept a stern and resolute vigil over his highly-prized western Temple. Once again, by retaining possession of two of these holy sites he earned himself another Permanent Victory Point. To cap off a subtle and effective turn, he celebrated by procuring a "Priestess" which reduced his future Power Tile expenses by one.

Smarting a bit from his narrow loss to me, Mike added the "Charge!" Power Tile to his arsenal. It was also a pretty tame turn for Mike since he spent most of the time shoring up his Troop count and protecting his holdings. It was a sound move though since he once again finished the Cycle in possession of two Temples, scoring another Permanent Victory Point in the process!  

With an end to the game in sight, it made sense that the two players who were lagging behind at first made the most aggressive moves during this Cycle. Chad started by ramping up his Red Pyramid to Level Three and then scoring a bonus Permanent Victory Point by snatching up the matching Level Three Red Power Tile.  He also went right after Andrew, ousting him from the centrally-located Temple on the western bank of the Nile. 


CYCLE FOUR

Bolstered by the fourth-level Power Tile "Reinforcements", Andrew surged back after being assailed by multiple foes. After all was said and done, he managed to pry the great northern Temple out of Mike's mitts thanks to a reconstituted / Snake-assisted Troop. At the end of the Cycle Andrew was quick to sacrifice a Unit, gaining a temporary Victory Point and five key Prayer Points as well.

Mike flirted with triumph after he used his "Hand Of God" ability to cap out his White Pyramid and score a Temporary Victory Point. He also used his surplus of Prayer Points to buy a Permanent Victory Point on a White Level Three Power Tile. His control also remained resolute over all three Districts of his home City as well as the easterly Temple. With a possible seven points waiting to pile up by the end of the Cycle, Mike was definitely a threat!         

Still mourning the loss of my precious "Sanctuary of All Gods" I bombed back into the region with a small crack team of commandos led by a giant Ancestral Elephant. So much for stealth; this move really created some chatter around the table. Not long after I was forced to accept the fatal flaw in my grand plan: I'd claimed w-a-a-a-a-a-y too many Permanent Victory Points without improving the nuts and bolts fighting power of my Troops.

As a result I quickly turned into the table's punching bag. Mike clobbered me twice on my own turf, seven Strength to two and then six Strength to five. Then I barely held my ground in a dust-up with Andrew at seven Strength apiece. Finally Jeremy took a crack at me and won with ten Strength to seven. By the end of the Cycle I'd bounced back to field a new five-Unit Troop in the desert which put pressure on both Mike and Jeremy's captured Temples.

Jeremy continued his resurgence by increasing his White Pyramid to Level Two and purchasing a brutal Red Power Tile called "Initiative" which let him destroy two enemy Units before a battle even began! He then channeled this pack of crazed hooligans towards destroying every last man, woman and child Andrew had on the board. He attacked the Level Four Blue Pyramid District in Andrew's City but the wily defender managed to conjure up twelve points of Defense to Jeremy's eight and cast the invaders back outside the eastern wall. Even though Jeremy lost the fight he did manage to wipe out all of Andrew's Units during this particularly nasty fracas!

He fared a lot better against me, but then again, who didn't? He also managed to hold on to the east bank of the Nile Temple not knowing that Chad secretly harbored nefarious designs on the Temple to the south-west, which Jeremy had occupied since the beginning of the game.

Taking note of how tight the race was, Chad knew that victory would probably go to the player who could score the easiest and quickest Victory Points. As such, he hastily invested four Prayer Points into maxing out his Red Pyramid for a temporary Veep. In an effort to bolster the final stages of his military comeback, Chad then retained the services of the Level Four Phoenix which gave him a bonus Movement and +2 to combat Strength. Even scarier: he now had the ability to ignore City Walls!  

Anxious to test out his new toys, four of Chad's Units swarmed Jeremy's Temple to the south west. He also kept careful watch over the mid-board Temple on the west bank of the Nile.


CYCLE FIVE

The turn order remained identical for the last Cycle of the game. To aid in his eleventh-hour military campaign, Andrew invested in the Level Three Power Tile "Prescience" which forced his future opponents to reveal their Battle Card before he played his own. Tricksy! He used this ability, along with his other cumulative assets, to engage in several key scraps, one of which saw Mike ousted from the western Temple he'd lovingly held since the start of the game.

"The Hand Of God" continued to serve Mike very well and he succeeded in capping out his Blue Pyramid at Level Four.  Denied the benefit of holding two Temples for a permanent Victory point, Mike struck back, knocking Chad out of his perch in the Temple to the south west.

As for me, I might as well have been sitting there with a sign that read: "CHEAP VICTORY POINTS HERE - PLEASE ATTACK." I tried to protect myself with the Level One Blue Power Tile "Defense!" but it was too little, too late. As a result I had to suffer the indignity of Chad waltzing into my City District and sponging off of my Level Four Blue Pyramid. Apparently I was the only one who noticed how close Andrew was to victory, which inspired a sad, final "Hail Menhit"-style attack on his eastern Temple. But in the end I just couldn't compete with his juiced-up forces.

With a war-footing fueled by the Level Two White Power Tile "Divine Intervention", Jeremy retained the eastern bank of the Nile Temple and his three City Districts. Unfortunately he just couldn't get traction anywhere else on the board and his forces were rebuked in an invasion attempt on Mike's Temple to the south west.

Knowing that it was now do-or-die, Chad raised his White Pyramid up to Level Four, netting a Victory Point in the process. He then decided to go for the el cheapo win by using his recently-acquired Phoenix to air drop a Troop into my Level Four Blue Pyramid District. As you can well imagine, my efforts to stop him were like Sansa Stark challenging Sandor Clegane to a bare knuckles fist fight. Instead of mounting a spirited defense my army proceeded to roll over and ask for belly rubs.

At the end of that fifth Cycle someone at the table proudly boasted that the game was over and that they'd won. There was nothing left to do now then verify everyone's Victory Points and confirm if the declaration was true!


END-OF-GAME VICTORY POINTS

Jeremy...5 Victory Points

Me...5 Victory Points

Mike...8 Victory Points

Chad...8 Victory Points

Andrew...9 Victory Points


ANDREW WINS!!!

***

REVIEW

Pros
  • The Battle Cards add some very interesting aspects to this light war game. The fact that you discard a Card every time you play one adds a tremendous amount of guesswork. Timing an attack is critical, since you want to tackle an opponent when they have less Battle Cards then you do. Also, if you think that the upcoming battle is futile, you can either play a card that minimizes your loses or costs your opponent some extra casualties. Bonus points: since most fights consist of throwing down a single Battle Card apiece, scraps are usually over in a flash.  
  • Since landmarks are all nicely equidistant from one another and you have the ability to Teleport, player interaction is pretty constant and there isn't a lot of down time. 
  • The Power Tiles add a nice evolutionary arc to the game.
  • Prayer Points are a simple, effective and thematically-appropriate commodity to fuel the game's economic engine.  
  • The Divine Intervention cards add a dash of chaos and unpredictability to the game.   
  • Annihilate your opponents in style with these gorgeous components! The board is brilliantly designed with Regions, Temples and Districts clearly delineated from one another. The iconography on the Power Tiles is clear and the accompanying artwork is just stunning. The Victory Point chips are durable and easily distinguishable from one another. The d4 Pyramids are great and I'd love to bust 'em out in D&D session just to give my dagger damage rolls a bit more flair! The Player Boards are colorful as well as functional. The Battle and Divine Intervention cards are made of quality card stock and don't require a hieroglyphics expert to interpret. Finally, the miniatures are awesome! Just look at these things; it's like playing Iron Maiden's Powerslave: The Board Game!     
METAL...AS...FUCK

Cons
  • Turtling should never be an optimal strategy in any war game but in Kemet going defensive is a joke. If I ever play the game again I'm going to ignore the Blue Power Tiles because you only get Victory Points for winning offensive battles right from the start. Sooooo, why purchase the Blue tiles when the Red ones help you optimize this disparity right away?
  • Honestly, I kinda hate the whole "Teleportation" thing. IMHO, the ability to just pick up your Units on any Pyramid space and then dump them wherever there's an obelisk is completely anathema to an area-control war game. Strategic maneuvering goes right out the window and the game starts to feel like an endless string of rock / paper / scissors contests. Yes, Teleportation should have been included in the game but perhaps on a Power Tile with limited use. Put it this way: standard movement was barely used in our game in lieu of all the rampant Stargate crap.
***
For me, Kemet pales a bit when compared to Cyclades. Notwithstanding the fact that I prefer the ancient Greek over the ancient Egyptian theme, Cyclades feels more war gamey and less fighty, the strategies make more sense, the movement is more reasonable and the titans are more headstrong.

Nevertheless, Kemet is a fun way to spend an evening. It's quick to play, gorgeous to behold, the battles are fast and furious and the "civolution" aspects are fun and light. Plus: MONSTERZ!!! 

Kemet scores four pips out of six with a neck-craning tilt up towards Ra, the sun god!  


***

Looking for an excuse to flaunt your Deep Desert Snake? Click on the mirage below to look upon ye mighty copy of Kemet whilst paying tribute to this humble scroll of bloggery.  


Thursday, February 27, 2014

A Kick In The (Coco)Nuts: "Robinson Crusoe: Adventure on the Cursed Island"

It's been a bad month for gaming, folks.

Illness, work *slash* family obligations and an almost laughably-poor track record of bad weather on Wednesday nights have really wreaked havoc on Game Night. In fact, prior to last week, we hadn't gotten together as a group in over a month!

But last Wednesday everything finally came together. While Mike, Dean and Chad battled it out in a three-player game of Eclipse, Kris led Andrew, Jonathan and I through a session of the latest cult of the new darling: Robinson Crusoe: Adventure on the Cursed Island!


Although I'm a sucker for co-operative games, many of them fall short when it comes to thematic richness. Well, leave it to Stronghold designer Ignacy Trzewiczek to come up with a game that's not just challenging it tells a riveting story in the process!

So sit right back and you'll hear a tale...as told by the game's North American publisher Z-Man:

"Take on role of one of four characters from the ship crew (cook, carpenter, explorer and soldier) and face the adventure. Use your determination skills to help your team mates, discuss with them your plan and put it into practice.

"You will build a shelter, you will build palisade, weapons, you will create tools like axes, knives, sacks, you will do everything you can to… to survive. You will have to find food, fight wild beasts, protect themselves from weather changes…

"Search for treasures. Discover mysteries. Follow goals of six different, engaging scenarios. 
Start from building a big pile of wood and fire it to call for help, and then start new adventures. Become exorcist on cursed Island. Become treasure hunter on Volcano Island. Become a rescue team for a young lady who’s stuck on rock island…"

Hey, Z-Man Games, you know I love you guys and all but *wow* who the hell does your game descriptions? This reads like a press release for Survivor as written by a member of the Politburo circa 1963. Well, at least you can make it entertaining by reading it in an exaggerated Boris Badenov voice. "In Soviet Russia, board game plays you!"

Seriously, guys, call me. My rates are competitive and I can at least make it look as if you know how basic sentence structure works. Jesus.

Anyway, if you wanna read the full rules, use your l'il electronic spyglass to peep out the full details right hur.

By all accounts, Kris did a great job explaining how the game works, despite the fact that the rules are slightly less impenetrable then Daniel Defoe's original novel. After setting up Scenario One ("Castaways"), he encouraged us to hand-pick our characters and within little while we were all swimming to shore!

Image source: http://boardgamegeek.com/image/1449141/robinson-crusoe-adventure-on-the-cursed-island

CHARACTER SELECTION

Andrew...The Soldier
Me...The Cook
Jonathan...The Explorer
Kris...The Carpenter


Striking out boldly from our sea-side camp, Andrew split his Player Pawns between two different regions, looking to cover as much ground as possible. The gamble worked perfectly and Andrew revealed the first two adjacent locations. The first was a Grassland/Jungle region netting us a Discovery Token and a Treasure courtesy of the Mystery Deck.  The second hex turned out to be a Mountainous terrain region bearing another Discovery Token and a potential new place to move our camp. We decided to do this right away, assuming that it would make it easier to explore the interior of the island. 

Unfortunately the latter site was also home to some sort of anonymous Wild Beast. True to form, Andrew charged into the underbrush, hoping to flush out a Deer for some easy F&F (I.E. Food n' Fur). Unfortunately the creature turned out to be less Bambi and more Peter Pan. Eventually Andrew managed to wrestle the 6-Strength Alligator in submission by inserting his thumb up its anus Steve Irwin style, but it came at a terrible cost. Since our Weapon Level was still hideously low, it inflicted five Wounds on him and gave us only three Food and no Fur. D'oh!!!  

After gathering up some Food I took an "Arranging The Camp" action in order to procure some badly-needed Determination Tokens. I wanted to whip up "Grandma's Recipe" and heal Andrew for two points of damage but by the time I got all of my ducks in a row, everyone was beat up. Suddenly my curative efforts were akin to holding back a tsunami with a roll of Bounty paper towel. As such, I held on to my healin' prescription for an even more dire occasion, which prompted Andrew to take a Rest Action in Camp to regain a Wound.  


At first my Player Pawns were divided between some clearly-beneficial effect (such as "Food Crates" in the Threat Action Field) or trying to avoid some terrible crisis that would ruin us if not addressed. Damage control became even more of a diversion as the weather turned increasingly sour towards the end of the game. To make things even more difficult my initial Resource Gathering rolls were no-where near as good as Andrew's, which forced me to use my "Scrounger" skill on at least two occasions in order to re-roll failures. 

Inspired by Andrew's initial success, Jonathan played to his namesake and attempted to explore two Island Tiles at once. Unfortunately his luck was a bit spottier, drawing some "Unsuccessful" die results and a few Wounds in the process. Eventually he experienced a breakthrough and mapped out a Mountainous region dominated by steep canyons and cliffs. Of course this new tile was also home to another Wild Animal which would likely chew our collective faces off if given half a chance. 

Things weren't all grim, however. This new tile also contained a Food Source, a Discovery Token and another Treasure! This mysterious artifact turned out to be a Barrel which allowed us to Heal some Wounds and store away two perishable Food items for safe keeping. Jonathan decided to press on to a new tile but promptly got "Lost" when his exploration attempt forced him to deal with a mandatory Adventure card. He took more damage that night from hunger but the following morning we all got a positive Morale bump when finally found his way back to camp.


Speaking of Morale, every time one of us dipped below the Decrease symbol it caused our collective Morale to drop by a point. This, in turn, cost us Determination Tokens and if we couldn't pay it, the excess manifested in more Wounds. The really cruel thing is: even when we managed to claw our Life Track score back up above the decrease hurdle, our Morale stayed the same! Seriously, Ignacy, do you really hate the world and everything on it that much?  

Like me, Kris spent a lot of time putting out fires. After acquiescing to the dictates of mob rule, he set about moving our camp further into the interior. This made future expeditions easier as predicted but it did sweet fuck all for our resource production. Plus the camp was wide open to Wild Animals, which had a habit of wandering past our sieve-like defenses in order to pilfer our Food and/or take a l'il nibble on our alluring and tasty jugular veins. 

Kris did what he could to strengthen our Roof and/or Palisade Level but just as soon as he was done, a Disaster, a Ravishing Windstorm or a Diseased Yak would bomb in and break our shit like the Tazmanian Devil strung out on bath salts. As a result we were ill-prepared when the game's difficulty level went up (!) and the weather started to turn particularly sour. Even after using my special ability to goon everyone up on "Hooch" to ignore the crappy weather, Kris was forced to take a Rest action in order to prevent himself from dying.  


We also weren't doing so shit hot when it came to Inventions. Discovering Mountains and Grasslands right away meant that we had the potential to develop certain things like a Cure and a Basket but what we really needed was the Pot which would allow me to convert Food to Health on a one-for-one basis. This required that we find a location with Hills so Andrew and Jonathan kept hammering away at exploration. Unfortunately, the next two tiles turned up Plains, which did feature a total of five Discovery Tokens, a Food source, Wood production and, hey, what the hell...two more Wild Animals! Yay!

About around that time Kris picked up on a glaring omission.   

"Um...I knew I missed something," he confessed sheepishly.

"What?" we all demanded.

"Well, we're all supposed to start the game with an Invention," he replied, taking up the appropriate deck of cards.

"I was wondering why it said 'Spear' next to my character card!" Andrew declared.

After Andrew claimed the thematically-appropriate weapon, Kris took a Snare, I was given a Fireplace and Jonathan was handed a Shortcut.  This inspired a rash of Inventions, including the prerequisite Rope, Knife, Dam and Fire. In order to facilitate the discovery of that all-important Hill Tile, Jonathan fast-tracked the development of a Map. Unfortunately the next two tiles he and Andrew turned up were River Tiles for a combination of four new Discovery Tokens, two Food icons, a Wood resource and, yes, another Wild Beast, this one coming into the game with a +1 Strength chip. Rawr! 

Now armed and considerably more dangerous, Andrew ventured back into the underbrush where he skewered some Birds. Unfortunately a coupla scrawny macaws didn't provide a whole lot of good eatin': only two Food and a pile of useless though admittedly colorful feathers. On his third attempt he finally hit the jackpot, taking down a Tapir for two Food and, finally, a Fur! Meanwhile I used our Bible to take an "Arrange the Camp" action to gain a point of Health and three Determination tokens. Somehow I suspected that I was gonna need it.  


We now had a surplus of four hides which Kris was keen to use to improve our shelter. Unfortunately our lumber production was slim at best, so he spent one Wood to Invent the Hatchet, giving us a +1 Wood production bonus on our home tile. Just as Kris started to get to work on shoring up our Roof and Palisade, he managed to give himself a special lingering Wound which kept cropping up from time to time to haunt and annoy him. 

That's when we all realized that we only had about six turns left to complete the scenario's required woodpile! Hastily we filled up the first two tiers before we were rocked by a series of crippling catastrophes. First up a Puma armed with a can opener snuck into our camp and made a dent in our nonperishable Food supply. Then Andrew diced up another truly horrendous Weather roll with a side order of freakin' snow. Snow? I though this was a desert island! Ugh! This forced me to blow all three of the Determination Tokens I was squirreling away in order to minimize just one of these nasty results.

Unfortunately all this really did was prolong the inevitable. On the very next Night Phase, after paying our hefty Morale penalty, we quickly realized that all we had left to eat was a small tin of Vegemite, some peanut butter smeared in a playing card and a roast beef sandwich from Arby's. Obviously, when faced with such heinously unpalatable prospects, we all decided that the most logical course of action was to just to give up and starve to death. 


Let's face it folks: we got absolutely pwned by Robinson Crusoe. We didn't even make it past the sixth round, few Crissakes! Yes, it might have been slightly easier if we had our specialized items right off the bat, but I'd be lying to you if I said that this was the cause for our abject failure. Granted it would have been nice to find that damned Hill tile and construct some really practical items, but once again, I can't blame our poor showing on this alone. 

OBSERVATIONS
  • Invent shit as quickly as you can since increasing your efficiencies can really stave off Morale drain. Man, just look at that final photo; we didn't do jack shit!    
  • The jury's still out on whether or not we should have moved out camp so early. When the option came up right away we immediately went for it, probably fearing that investing in our first location would be a waste of effort if we had to move later on. Sure this helped facilitate our future expeditions but we also really could have used the extra Food produced by our starting tile.
  • For the love of everything holy, make sure your Weapon Level is cranked up a little bit before you goad your team-mate into Hunting. Not only is it difficult to find Food, it's even harder to Heal so those Wounds you suffer at the start of the game might end up lingering forever. 
  • Once you've settled on a permanent camp, you really need to build up your Roof and Palisade Levels as soon as possible. Food and Determination Tokens are scarce enough without needlessly burning through them just because you haven't invested in some basic infrastructure. 
  • Splitting up your Player Pawns might seem like a good idea at the time but failure at a critical juncture can really put you behind the eight-ball. I'm pretty sure that we defied the odds with all of our failures and the game makes you pay for this through the nose. 
  • There's no question that exploration is critical to opening up the inventory, but I also think that it's wise to take some time to invent some stuff that will increase your odds for sucessful exploration. KnowwhutImsayin'?
  • Do whatever you can to keep your Morale buoyed up, lest you start sinking into what Kris accurately describes as a "death spiral". Remember: as soon as Morale starts to dip into the -2 / -3 range you either going to be burning an equal amount of Determination Tokens or sucking up what's left in Wounds. And trust me, if you don't have a constant surplus of Determination Tokens to fulfill your Character's most basic functions, then you might as well try and swim to safety! 

REVIEW
PROS
  • The game's physical properties are just about perfect. The board itself looks like a series of charts spread out on a table, which kinda made it blend in perfectly with Dean's gaming table! A plethora of gorgeous bits abound including customized dice, wooden cubes, colorful chits, durable location tiles and a bad-ass Wild Animal Deck. Particularly notable is the evocative and makeshift artwork which conjures up images of Wilson in Cast Away. 
  • Some games claim to be co-operative but this one really delivers on that promise. In order to have a hope in hell of surviving, y'all really do need to work together. As you might expect, this encourages an incredible amount of quality table-talk.
  • Even after deciding on a general course of action, individual players are still left with two or three choices as to how to go about doing it. As a result, Bossy Veteran Syndrome™ is kept to a minimum.  
  • Unlike many other co-ops, Robinson Crusoe tells a clear and interesting narrative by the time it's over. Even if your vitals end up giving a Tiger indigestion. 
  • The story is fulfilled by a myriad of game variables provided by Inventions, exploring Island Tiles, Character Skills, Threat Actions, Adventure Cards, Items and Camp Arrangement. This translates into a lot of possibilities, even when replaying the exact same scenario.   
  • Designer Ignacy Trzewickek has done an excellent job simulating in board game terms what it would be like to try to survive on a dangerous desert island. There's nothing worse then beating a co-operative game on your first try. No fear here, BTW. 
  • The scenarios all look to be varied and challenging in their own unique way. Plus: major props for including a King Kong-flavored challenge!  
CONS
  • The game's rulebook is about as comprehensive as an episode of Gilligan's Island played backwards, upside down and in Latin. As I mentioned, Kris did a pretty decent job getting us all up to speed but in order to do so, he had to seek out, print and then review an extensive FAQ document that's about as long as the rules themselves. For me, this is a huge demerit. Z-Man really needs to include a vastly-improved rule book in all future printings! 
  • The game is an inordinately cruel and unforgiving mistress. When things start to go sour, it isn't just a matter of watching victory slip away, it's a relentlessly-punishing, grueling odyssey of misery punctuated by minor accomplishments that actually make you feel like dancing naked on the table. If the group suffers an inordinately cruel series of setbacks right away and Morale bottoms out it's gonna be pretty tough to dig yourself out of that deficit.
  • Honestly, I have no clue why there's a correlation between the availability of certain inventions and the discovery of new terrain types. I'm sure there's a logical reason behind it, but for the life of me I can't make sense of it. 
***

If you're looking for an intensely-social game featuring plenty of tough choices, an uncompromising level of difficulty and a harrowing tale of survival, then you seriously need to take a look at this game.

As such, I'm gonna give this one five pips outta six with a tilt up towards the high ground!


***
Is Pandemic too pussified? Does Flashpoint lack a point? Do you just wanna see Forbidden Island sink into the sea? Well then click on the link below to order a copy of Robinson Crusoe: Adventure on the Cursed Island and help this blog survive!