Showing posts with label Daniele Tascini. Show all posts

Sunday, January 2, 2022

Full Play-Through - "Tzolk'in: The Mayan Calendar"

Yes, I’ve already sung the praises of this amazing game right here, but I wanted to do a full Tzol’kin play-through, mainly to lock the rules into my brain and give me the ability to table it whenever I want to.

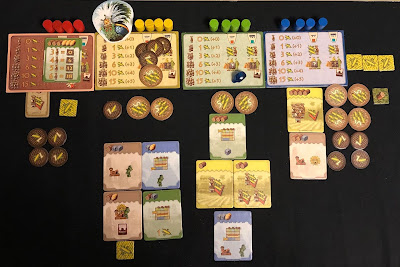
I’ll start off by showing (and explaining) the random Monuments (along the top row) and Buildings (on the bottom row) that I drew for this match, pictured down below from left to right:

Monuments

  1. Score VP’s based on the total number of Monuments built by all players. In a 4-player game, that’s 4 points per Monument.
  2. Score VP’s equal to the total number of Workers you have in play.
  3. Score 3 VP’s for every step you’ve taken beyond the starting space on one Temple of your choice.
  4. Score 4 VP’s for every gray-bordered Monument and Building you’ve built.
  5. Score points based on when you built it in: first quarter of the game – 40 points, second quarter – 31 points, third quarter – 22 points, fourth quarter – 13 points. (special promo tile) 
  6. Score points based on how many Technologies you managed to get to Level Three.

Buildings

  1. All of your Workers require one less Corn to feed.
  2. One of your Workers needs no Corn.
  3. Advance one Theology (Blue) Tech Space and go up one step on the Green (Kukulcan) Temple.
  4. Go up one step on both the Brown (Chaac) and Yellow (Quetzalcoatl) Temple.
  5. See #1.
  6. Gain one level in the Red / Yellow Architecture Technology.

And here are the starting Resources for all four players:

RED gets 3 Corn, 1 Wood and 1 extra starting Worker. To counter-balance this, he also takes an improvement that covers the Corn requirements for 1 Worker.

YELLOW starts with 9 Corn, 2 Stone, 1 Gold and 1 advancement on the Green (Agriculture) Technology Track.

GREEN begins the game with 8 Corn, 4 Wood, a 1-step drop on the Brown (Chaac) Temple space... mitigated by a 1-step advancement on the same track! He also gets 1 advancement on the Red / Yellow Architecture Technology Track.

BLUE kicks things off with 9 Corn, 4 Wood and 1 advancement on the Green (Kukulcan) Temple.
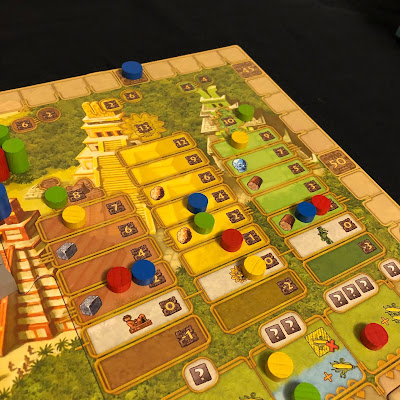
ROUND 1

Red pays a single Corn to place a Worker on the “0” space of the Green (Palenque) and Red (Tikal) Gears.

Yellow places a Worker on the “0” space of the Yellow (Uxmal) Gear and on the 1-Corn Red Gear for a total of 2 Corn.

Green drops 1 Worker on the “0” space of the Brown (Yaxchilan) Gear as well as the 2-Corn Red Gear for a total of 3 Corn spent.

Blue plays one Worker on the 3-Corn Red Gear and 1 Worker on the 1-Corn Yellow Gear for a total of 5 Corn!

Rotation 1

A Corn is added to the Gear tooth since the First Player token wasn’t taken.

ROUND 2

Red hops a Worker off the Red Gear, pays a Wood cube and advances his Green Agriculture Technology by one.

Yellow takes his Worker off the Red Gear and builds a Building for 1 Stone and 1 Gold, advancing both his Blue Theology Tech and the Green Yaxchilan Temple by one step each. 

Green adds his last Worker to the Yellow Gear for free.

Blue takes his Worker off the fourth Red Gear space, letting him build two Buildings. Unfortunately, he can only afford one, paying four lumber for a structure that will reduce his Worker’s Corn requirements by half! 

Rotation 2

A Corn is added to the Gear tooth since the First Player token wasn’t taken.

ROUND 3

Red places two Workers for 1 Corn, 1 each on the “0” space of the Brown and Red Gears.

Yellow spends a Corn to place Workers on the “0” space of the Green and Yellow Gears.

Green hops a Worker off the Red Gear and buys two Buildings, one of which covers the Corn requirements for one Worker and the other advances his Green Agriculture Tech and gives him a Stone. Since he also has the first Red / Yellow Architecture Tech advancement unlocked, this also earns him a Corn. 

Blue hops off the Yellow Gear, scoring a new Worker!

Rotation 3

A Corn is added to the Gear since the First Player token wasn’t taken.

ROUND 4

Red places his last Worker on the “0” space of the Brown track.

Yellow leaps off the Yellow Gear for a new Worker!

Green pulls a Worker off the Brown Gear for 1 Gold and 2 Corn. After removing a Worker from the trading space of the Yellow Uxmal Gear to get a Wood, he then hops off the Red Track, spending a Wood to go up on the Brown and Green Temple spaces!

Blue places Workers on the “0” spaces of the Red, Yellow and Blue (Chichen Itza) tracks, spending 3 Corn!

Rotation 4

A Corn is added to the central Gear since the First Player token wasn’t taken.

ROUND 5

Red removes two Workers from the Brown Gear, getting a Corn, a Wood and a Stone.

Yellow pays a single Corn to place Workers on the “0” spot of the Brown Gear as well as the First Player space, letting him collect the 4 accumulated Corn.

Green retrieves his Worker from the Yellow Gear and nets a new Worker.

Blue spends 1 Corn to place a single Worker on the second Brown Gear space.

Rotation 5

Yellow takes the First Player token. They’d like to rotate the central Gear twice, but since this would bump a Green Worker off,  it’s only advanced a single space. No Corn is added to the Gear since the First Player token was taken.

ROUND 6

Yellow places a Worker on the “0” space of the Red Gear for free.

Green hops his Worker off the last action space of the Red dial, paying 1 Stone to advance on the Brown and Green Temple spaces. 

Blue removes a Worker from the Brown Gear for 1 Corn and 1 Stone and then pulls one from the Yellow Gear to trade 4 Corn for 2 Wood. Next up, they hop a Worker off the Red Gear to buy a Building for 2 Wood and 1 Stone, which advances him on both the Brown and Yellow Temple tracks.

Red collects a Worker from the Red Gear, allowing for 2 Technology improvements. Sadly, he can only afford one, spending  a Wood and Stone to go up one on the Green Agriculture Track. He then removes his Worker from the Palenque Corn Gear and, thanks to his new Technology, he collects  9 Corn, even though it’s still covered by Wood. He also gets a bonus Corn from the previous improvement, for a total of 10.    

Rotation 6

Since the First Player token wasn’t taken, a Corn is added to the Gear. 

ROUND 7

Yellow removes from the Brown Gear for 1 Stone and 1 Corn. He then hops off the Red Gear, spending 2 Stone to advance on the Green Agriculture Tech track, making the Wood-covered Corn accessible.  He then removes a Worker from the Green Gear, getting 8 Corn (7+1 for the Tech improvement). Next up, he hops off the Yellow Gear, letting him buy a Building for 2 Corn per regular resource. He returns 6 Corn to the bank, buying a Building that gives him a boost on the Green and Brown Temple track.

Green pays 1 Corn to place a Worker on both the “0” Green and Brown Gear spaces.

Blue spends a single Corn to place on the 1-Corn Green Gear.

Red spends 4 Corn to place on the “0” and “1” Yellow Gear spaces and on the “0” Red Gear spot.

Rotation 7

Corn is added to the Gear Tooth since the First Player token wasn’t taken.

ROUND 8 

This next round will conclude the first quarter of the game! As such, this is a Feeding Round, with Bonus Resources coming from Temples.

Yellow pays 3 for placing Workers on the “0” spaces of the Brown, Red and Yellow Gears.

Green spends 2 Corn to place a Worker on the 2-Corn Brown Gear.

Blue removes a Worker from the Agriculture wheel, takes a Corn tile and gets 4 Corn.

Red plays their last Worker on the First Player space, taking the two Corn on the Gears!

Middle of Age I - Food Day

Red has 4 Workers, but only pays 6 since one doesn’t eat Corn.

Yellow also has 4 Workers, but no efficiencies, so he pays 8 Corn.

Green has 4 Workers, but pays 6 since one doesn’t eat Corn.

Blue has 4 Workers and a Building that reduces food costs by -1 per Worker, so he pays 4 Corn.

Temple Resource Rewards

Green, Blue and Yellow both get 1 Stone a piece. Yellow, Green and Blue get 1 Wood each.

Rotation 8-9

Red opts to advance the Gears by two spaces, flipping their player card to signify this!

ROUND 9

Red takes a Worker off the Yellow Gear to get a new Worker!

Yellow removes from the Red Gear and buys a Building that advances his Brown Resource Extraction Tech and also gets him a free Corn.

Green places a Worker for free on the “0” space of the Red Gear.

Blue plays 2 Corn to play on the Brown Gear’s “0” space and the 1-Corn Red Gear.

Rotation 10

Corn is added to the Gear tooth since the First Player token wasn’t taken.

ROUND 10

Red removes from the Fifth Yellow Gear space, letting him choose any other non-Chichen Itza space. He opts for the fifth Brown Gear spot, which earns him 1 Gold, 1 Stone and 2 Corn.

Yellow fills up the first 2 slots of the Green Gear, paying 2 Corn to do so.

Green removes from the Red Gear and pays 1 Wood and 1 Stone to take the Green Agriculture Tech advancement, making the Wood-buried Corn accessible. He then gets 8 Corn for hopping off the Green dial, adding +1 for the prior advancement. Finally, he retrieves both Workers from the Brown Gear, getting a Crystal Skull, a Gold, a Stone and 2 Corn.

Blue places their last Worker on the “0” Brown Gear slot.

Rotation 11

Since the First Player token wasn’t taken, a Corn is added to the central Gear tooth.

ROUND  11

Red hops off the Red Gear, paying 1 Stone to take two different Temple steps, namely Brown and Green.

Yellow removes both Workers from the Green wheel, getting 4 Corn for Fishing and then another 5 from the Corn field next door. After recovering a Crystal Skull from the Brown Gear, they finish up by removing a Worker from Yellow and paying 4 Corn to buy a Building that advances any Temple Track. He chooses the Brown Temple. This same tile gives the option to buy another Building at regular cost, but he’s out of Resources.

Green pays 3 Corn to drop Workers on the "0" spot of the Red, Yellow and Blue Gears.

Blue removes a Worker from the double Tech Improvement space of the Red Gear, paying two resources (Stone and Wood) to advance on the Brown Resource Extraction Tech and Blue Theology Tech tracks.

Rotation 12

A Corn is added to the Gear tooth since the First Player token wasn’t taken.

ROUND 12

Red pays 2 Corn to place Workers on the first 2 Green Gear spaces.

Yellow spends 1 Corn to play on the Brown and Blue Gear’s “0” spaces.

Green pulls off the Yellow Gear, paying 3 Corn to advance on the Brown Temple Track. He also hops off the Red Gear and pays 1 Stone to advance on the Blue Theology Tech track.

Blue places their last Worker on the First Player spot, helping themselves to 3 Corn!

Rotation 13 

No Corn is added to the Gear Tooth since the First Player token was taken by Blue. They can’t move the Gears twice, since it would launch their own Worker off the Chichen Itza Gear!

ROUND  13

The completion of this round represents the end of Age I and the mid-way point of the game. Not only is this a Feeding Round, players will also score Victory Points from Temples!

Using good timing, Blue removes from the Brown Gear to get a Crystal Skull and then removes a Worker from the very last Blue Gear space, choosing the play on the previous slot for 13 VP’s, a Gold and a step up on the Gold Temple!

Red pulls off two Green Gear spaces, collecting a grand total of 9 Corn, 4 from the Fishing space and 5 from the Corn fields.

Yellow hops off the Blue gear, placing a Crystal Skull 1 spot higher...thanks to his Tech improvement. This nets him 5 VP’s and a bump up on the Brown Temple space!

Green does the exact same thing, placing a Crystal Skull one slot higher thanks to his Tech improvement. This nets him 6 VP’s and a bump up on the Brown Temple space!

End of Age I - Food Day

Red has 5 Workers, but pays 8 since one doesn’t need to be fed.

Yellow also has 4 Workers, but no efficiencies, so he pays 8 Corn. Unfortunately, he only has 6 so he takes a -3 VP hit!

Green has 4 Workers, but pays 6 since one doesn’t eat anything. Unfortunately, he only has 4, so he also takes a -3 VP hit!

Blue’s Building reduces food costs by -1 per Worker so, with 4 Workers, he pays a measly 4 Corn.

Temple Victory Point Rewards

Green gets 7 points from the Brown Temple, Yellow gets 6 while Red and Blue each get 2 apiece. Bonus points: Green gets 6 more points! 

Only Blue gets points from the Yellow Temple: 2 for the space and another 2 for the bonus for a total of 4!

Green Temple: Green and Yellow get 3 points apiece. The same players get half the bonus: 2 points apiece! Finally Red and Blue get 1 point apiece. 

Rotation 14

Corn is added to the central Gear since the First Player token wasn’t taken.

ROUND 14 

Age II begins and new Building Tiles replace the ones from Age I

Blue takes a Crystal Skull from the Brown Gear!

Red places on three “0” spaces: Brown, Red and Blue, which costs a total of 3 Corn.

Yellow places on the “0” Green Gear.

Green places on the “0” Yellow Gear.

Rotation 15

Since the First Player token wasn’t taken, another Corn is added to the main Gear.

ROUND 15

Also devoid of Corn, Blue places on the “0” space of the Green wheel.

Red pulls off two Workers from the Green Gear, getting a whopping 6 Corn from one space and 8 from the other!

Yellow hops off the Green Gear to Fish, taking 3 + 1 for his Tech Improvement for a total of 4 Corn.

Green adds a Worker to the “0” space of the Brown Gear for free.  

Rotation 16

One Corn is added to the Gear tooth since the First Player token wasn’t taken.

ROUND 16

Blue adds a single Worker to the “0” space of the Yellow gear.

Red pays a single Corn to place on the 1-Corn Yellow Gear space.

Yellow removes to get a Crystal Skull.

Green plays on the 0-Corn Green Gear.

Rotation 17

Another Corn is placed on the central Gear since the First Player token wasn’t taken.

ROUND 17

Blue pulls off the Green Gear, getting 4 Corn, then hops off the Yellow Gear, spending 3 Corn to advance on the Yellow Temple track!

Red pulls off the Yellow dial, trading 12 Corn for 3 Gold.

Yellow places Workers on the “0”-level Green, Brown and Blue Gears, costing them 3 Corn.

Green places a Worker on the First Player space and gains all of the Corn that’s been piling up there!

That Worker immediately comes back and Green gains the First Player Token. Green then decides to move the Gears twice, flipping their player card over to signify this! 

Rotation 18-19 

Of course, no Corn is added to the Gears.

ROUND 18

Green leaps off the Yellow Track, paying 1 Corn to do any action on any Gear, save Blue. He decides to do the fifth action on the Red track, spending a Gold to go up on both the Brown and Green Temple spaces! Since he just reached the top level of the Brown Temple, he flips his Player Board back over to the lighter side, re-setting his ability to move the gears twice!

Blue spends 1 Corn, placing Workers on the “0” space of the Green and Blue Gears.

Red spends 2 Corn to place on the 1-Corn Green Gear and the “0” Brown Gear.

Yellow places on the “0” Yellow Gear for free.

Rotation 20

No-one took the First Player token, so 1 Corn is placed on the Gear.

ROUND 19

Green pulls off the Green Gear, getting 8 Corn and then removes from the Brown Gear for 2 Corn, 1 Stone and 1 Gold. After leaping off the second-to-last Yellow Gear, he pays 1 Corn to tap into the 5’th Red Gear space. This lets him return 1 Stone to progress on both the Yellow and Green Temple spaces!

Blue pulls off the Green dial to Fish for 3 food...I.E. Corn.

For 2 Corn, Red removes from the Brown Gear, fetching 1 Stone and a Gold. He also takes a Worker back from the Red dial, letting him choose any space of any Gear. He decides to advance his Green Agriculture Tech to the top tier and move the Blue Theology Tech up once, for a total of 4 Resources. Then Red removes from the Green dial, getting 8 Corn.

Yellow jumps off the Green dial, getting 8 Corn. He then uses his Blue Theology Tech to remove from the Blue Gear, letting him place a Crystal Skull a level higher than normal, netting him 7 VP’s and also helping him advance on the Green Temple space. He then hops off the Yellow dial to advance on the Green Temple space again!

Mid-way through Age II - Food Day 

Red has 5 Workers, but pays 8 since one has a Corn allergy.

Yellow has no farming efficiencies, so he pays 8 Corn for his 4 Workers. 

Green has 4 Workers, but pays only 6 since one is on a Corn-free diet.  

Blue has a Building that reduces food costs by -1 per Worker, so he pays 4 Corn for his 4 Workers. Unfortunately, he only has 3, so he loses 3 VP’s!  Whoopsie!

Temple Resource Rewards

Green and Yellow both get 2 Stone while Red and Blue get 1 Stone apiece!

Blue is the only one to get a Gold from the Yellow Temple.

Yellow and Green both get a Crystal Skull and 2 Wood while Red and Blue each get 1 Wood. 

Rotation 21

A Corn is placed on the big ol’ Gear since the First Player token wasn’t taken.

ROUND 20

Green spends 3 Corn to place Workers on the “0” spaces of the Brown, Red and Blue gears.

Blue is woefully Corn-poor, so he places a Worker on the “0” space of the Green Gear.

Red pays to place on the 1-Corn space of the Brown wheel.

Yellow pays 2 Corn to play 2 Workers, one on the “0” space of the Yellow wheel and one on the 1-Corn  Blue Gear.

Rotation 22

No one went to the First Player space, so Corn is added to the Gear.

ROUND 21

Green places a Worker on the 0-Corn space Brown Gear.

Blue drops another single Worker on the “0” space of the Green dial.

Red places a single Worker on the 0-Corn Red Gear for free.

Yellow pulls off the Brown Gear for 2 Corn, 1 Gold and 1 Stone.

Rotation 23

Corn is dropped on the central Gear Tooth since the First Player token wasn’t selected.

ROUND 22

Green pulls off the Red Gear to buy a Building which will completely feed 3 more Workers! Since he also has the Level 1 Red / Yellow Architect improvement, he also gets a free Corn.

Blue places on the lowest rung of the Brown Gear for free.

Red pulls off the Brown Gear, gaining a Crystal Skull. Thanks to his Blue Tech, Red can also remove one level higher from the Blue Gear, opting for the 11 VP level, which also gains him a bump on the Yellow Temple track and a free Wood. He then removes his last Worker from the Brown Gear for 1 Gold and 2 Corn.

Yellow removes from the Trading space of the Yellow Gear, trading 1 Stone for 3 Corn and then 2 Corn for a lumber.

Rotation 24

The First Player space was left alone, so one Corn is added to the Gear tooth.

ROUND 23

Green places on the “0” space of the Red Gear for free.

Blue hops off the Green dial, cutting down the forest for 2 lumber!

Red pays 1 Corn, placing 2 Workers on the “0” space of both the Green and Brown Gears.

Yellow pulls off the Blue dial, using their Tech to place one level higher...specifically on the 8 VP space, which also earns him a climb up on the Green Temple space.

Rotation 25

A Corn is placed on the Mega-Gear since the First Player space wasn’t selected.

ROUND 24

Green pulls off the Brown wheel for 1 Gold and 2 Corn.

Blue removes from the Green wheel, picking up the now-revealed Corn tile for 5 Corn.    

Red removes from the Brown Gear for 1 lumber.

Yellow spends 3 Corn to place on the “0” Space of the Green and Yellow Gear, as well as the First Player space! He promptly collects the 6 Corn that’s been piling up on the wheel.

Rotation 27

No Corn is added to the Gear Tooth since the First Player token was taken. Yellow gets the first player token and no additional Gear move is performed.

ROUND 25

Yellow removes from the Green dial and catches 4 elusive Corn Fish. He pulls back from the Blue dial, getting 4 VP’s and a step up on the Brown Temple space.

Green retrieves from the Red dial, letting him construct a Building which gives him a step up on the Blue Tech track and a 1-tier improvement on both the Brown (capped out) and Green Temple tracks, the latter of which locks in the top spot for him! Green then removes from the Blue dial, using his Theology Tech to place a Crystal Skull on the 8 VP space, gaining him 1 Gold and letting him move up on the Green temple track. Since he just unlocked the second tier Blue Tech track, he pays 1 Stone to go up 1 space on the Yellow Temple. Finally, Green spends 1 Corn to take a step backwards to do the Crystal Skull action on the Brown gear!

Since he doesn’t have a Crystal Skull, Blue’s Worker on the Blue Gear is stranded. So, he just pulls off the Brown Gear for 2 Corn and 1 Gold.

Red removes from the Red Gear and pays 3 Wood and 3 Gold for the Monument which gives VP’s for Workers. He then removes from the Green dial for 7 Corn.

End of Age II - Food Day

Red has 5 Workers, but pays 8 since one doesn’t need any Corn.

Yellow also has 4 Workers with zero efficiencies, so he pays 8 Corn. 

Green has 4 Workers, but pays “0” because his Buildings cover the food costs for all of them.

Blue has a Building that reduces food costs by -1 per Worker, so he pays 4 Corn for his 4 Workers.

Temple Victory Point Rewards

Brown Temple

Green - 8 points

Yellow - 7 points

Red and Blue - 2 points

Bonus: Green - 2 points

Yellow Temple   

Blue - 4 points

Green - 2 points

Red - 1 points

Bonus:  Blue - 6 points

 Green Temple

Green - 10 points

Yellow - 9 points

Red and Blue - 1 point 

Bonus: Green - 4 points 

Goods Conversion 

Red 4 / 4 = 1 point

Yellow 20 / 4 = 5 points

Green: 10 / 4 = 2 points

Blue 24 / 4 = 6 points

Crystal Skulls

Green - 3 points  

Monuments

Red - 13 points

FINAL SCORES

Green 60

Yellow 53

Blue 40

Red 31

   ***    

Key rules to remember:

  • The Golden Rule: you can only either place Workers by paying the Corn cost based on the how many you played and their gear position or remove Workers in whatever order makes the most sense to you.
  • When you remove a Worker you can take a lower action space by paying 1 Corn per step back.
  • During Food Days, you lose -3 VP's per Worker you can't feed.
  • If completely out of food you can Beg For Corn. Lose all of your current Corn and take 3 from the bank. Unfortunately, this pisses off the Gods and you have to take a -1 step down on any Temple track. Pro-tip: if you have to Beg for Corn, do it when you have 0 Corn and not 1 or 2.  
  • If you place a Worker in the First Player position you collect all of the accumulated Corn, get the Worker placed there back at the end of the round and collect the First Player token. If you currently hold the First Player Token, pass it to the player on the left. You can move the Gears twice if you want, but only if it won't throw a Worker off the last space of a Gear.  
***
So, clearly I absolutely adore Tzolk'in: The Mayan Calendar, to the point where it might have a permanent home in my top five favorite games of all time. I love the Mayan theme, the aesthetics, the efficiencies you can create and the unique combination of worker placement combined with the timing involved with removing them from the gears to what you need to pursue a strategy. 

By performing and recording this complete play-through, I'm hoping that the fundamental rules will be permanently locked in my brain. If not, I can just pop back here for a quick refresher. Hopefully there are a few like-minded out there who will find this somewhat handy as well.

Before I go, I suppose I should address a point related to this game or, more accurately, its designer. Apparently Daniele Tascini has said some pretty stupid shit in the past, which he received well-deserved criticism and repercussions for. This, in turn, makes my love for this game a wee bit...complicated

I firmly believe that there comes a time when a popular work of art ceases to be the sole domain of its creator and the general public takes partial ownership of it. Daniele Tascini isn't the only person to work on Tzolk'in, after all, it was co-designed by Simone Luciani, beautifully illustrated by Milan Vavroň and published by the lovely folks over at Czech Games Edition. The hard work of these people shouldn't jettisoned merely because of the stupid comments of one person. 

Above all, I firmly believe that Tzolk'in: The Mayan Calendar is a genuine work of interactive art. And, as such, it's a baby that I'd rather not see cast out with the bathwater.    


Saturday, August 24, 2013

Apocalyptically Good: "Tzolk'in: The Mayan Calendar"

Our humble l'il gaming group sure has come a long way.  It started pretty modestly, back around 2005, when Andrew, Dean and I started to play through our budding collection of board games on an ongoing but irregular basis.  Five years later, on January 6, 2010, we finally made it official and locked down Wednesday evenings as our weekly gamin' night.

The format was simple: the three of us would take turns picking a game, prepping it and then hosting.  It was a decent little arrangement but with only three players, our options were pretty limited.  Two-player games were rare unless someone cancelled in advance and games optimized for a larger group of people, such as like Shadows Over Camelotwere useless to us.      

As such, we quickly added Chad to our hallowed fraternity just a week later.  Whip-smart, good-natured and casual, the rest of us knew right away that he was a perfect addition to the group.  Having a fourth player also meant that we could finally split into pairs for two-player games.  We still didn't have enough bodies to pull off truly epic games like Twilight Imperium, but we certainly had more options then before.


Wary of "outsiders", years ticked by before we added a fifth player.  In fact, in order to deter any undesirables, we'd freak out potential pledges with fraudulent initiation rites:

"Yeah, um...sure you can join our gaming group.  But first you gotta run naked down the full length of a football field with the Envoy Marker from Kingsburg between your butt cheeks.  Oh, and if you drop the Marker before you make it to the end zone you gotta swallow it."

Undeterred by the Holy Rite of the Tiny Wooden Dildo, Mike was informally added to the mix on September 1'st 2010.  At first we didn't offer him permanent membership, perhaps because we were laboring under the fallacy that we already had enough people but more likely because he worked so many weird, irregular late shifts that he often had to bail.  But by June 15'th 2011 his schedule had normalized and we were delighted to welcome him into the fold.  


As soon as we added Mike we knew we were finally cookin' with gas.  He truly represents the kind of person everyone should have around the game table: someone who's easy-going, ludicrously genial and a level of enthusiasm that's downright infectious.  As an added bonus, when Mike came along, we finally had the manpower to do justice to titles such as Battlestar Galactica or A Game of Thrones.

We've since added two more reserve members to the group in as many weeks.  Chad and Andrew's former co-worker Jeremy joined the week we played Love Letter and King of Tokyo.  And now we're hoping to add Kris to the mix, at least until he opens up Halifax's first ever board game cafe, appropriately dubbed The Board Room.  I say this because he's gonna be busier then a one-legged man at an ass-kicking competition when the place opens up in a few months.

It's great having so many players to pool from; we can now run several games simultaneously in one night.  The downside is that my tiny apartment can barely accommodate seven people much less multiple games.  My game room can comfortably seat four people at the most, which means that everyone else would be exiled to the dining room.  Ergo, it just makes sense to default to Dean's voluminous basement, even when its my pick.

Such was the case back on the 14'th of August.  I really wanted to table Star Wars Miniatures, since it's been forever and a day since we've played it.  But when all seven of us were confirmed, I abandoned that plan and picked one of Andrew's more intriguing recent acquisitions: Tzolk'in: The Mayan Calendar.  


With its rondel-style board, cryptic iconography and Mayan theme, this one's been on my radar since it was released last year.  In fact, in some circles, it's being hailed as a modern Euro-style classic.

So what's the lowdown on this one?  Welp, here's the official proclamation from the stern-but-fair gods at Czech Games:

"Tzolkin: The Mayan Calendar presents a new game mechanism: dynamic worker placement.  Players representing different Mayan tribes place their workers on giant connected gears, and as the gears rotate they take the workers to different action spots.


"During a turn, players can either (a) place one or more workers on the lowest visible spot of the gears or (b) pick up one or more workers.  When placing workers, they must pay corn, which is used as a currency in the game.  When they pick up a worker, they perform certain actions depending on the position of the worker. 

"Actions located 'later' on the gears are more valuable, so it’s wise to let the time work for you – but players cannot skip their turn; if they have all their workers on the gears, they have to pick some up.

"The game ends after one full revolution of the central Tzolkin gear. There are many paths to victory. Pleasing the gods by placing crystal skulls in deep caves or building many temples are just two of those many paths…"

Looking to auger additional signs from Plzdntmkmeevokethasterix, lord of all rules lawyers?  Then sacrifice a few moments, click on the following link and all shall be revealed.

***
Since the game is optimal with four players, Andrew, Jeremy, Kris and I tackled this one while Mike and Dean played an exhibition game of Blood Bowl.  Here were our color choices:  

Andrew...Red
Me...Yellow
Jeremy...Green
Kris...Blue


Noting the importance of an early stockpile of Corn and building materials, Jeremy split his Workers between the food-and-Wood-giving Green Palenque rondel and the Gold-and-Stone rich Gray Yaxchilan track.  By the time his industrious little ants were finished, he'd harvested three Gold, three Wood, twelve Corn and a Wood and Corn Harvest Token.  

Still haunted by nightmares of Agricola-style meeple starvation, I set about improving my food production.  After Kris made an off-handed remark about the value of Farms, I set about collecting the resources required to built one, sending my Workers up the Palanque and Yaxchilan tracks.  After collecting seven Corn, four Wood and a matching Harvest Token, I plunked a Worker down on the Red Tikal rondel.  Eventually I became the proud owner of brand, spankin' new Farm which would feed all my Workers for half the normal rate.  

Having played the game before, Kris was quick to diversify.  After pulling his Workers off the Palanque and Yaxchilan track he had all the raw materials needed to make some key builds.  After a few spins on the Tikal track, Kris erected a Shrine which improved his Resource Extraction Technology.  After that he constructed a low-grade Farm which allowed one Worker to go without Corn and a Tomb which gave him a +1 bump on the Chaac Temple Track.  Even after all of that he still had two Wood and a matching Harvest token left over.  Nice!   

Andrew tackled the game with his characteristic aplomb.  After swiping the Starting Player Marker from Jeremy, Andrew dispatched one of his Workers up into the mountains of Yaxchilan where he recovered a mysterious Crystal Skull cleverly concealed behind a waterfall.  On a subsequent turn the Skull found a permanent home on the sacred fourth sconce of Chichen Itza, which earned Andrew seven Victory Points and some major brownie points with Kukulcan.  Pleased with this result, he promptly dispatched two more workers on the exact same path.  


After wrestling the Starting Player Marker back from Andrew, Jeremy dropped one of his Workers on the Yellow Uxmal path and eventually added a new hire to his staff.  He then hedged his bets, scattering drones across the board in order to cover as many options as possible.  He put one dude on the Green Palenque fields for some Corn, sent another guy questing into the Yaxchilan mountains, and then dropped another gent on the Tikal track to speculate on some real estate.  After experiencing a serious food shortage he quickly invested in a Farm that halved his Corn requirements and then got a one point nudge in Theology Tech by placing a Shrine.  At the conclusion of this segment he was left with two Gold a painfully obvious Corn shortage.  

Noting Andrew's instant-gratification Victory Point windfall, I sent a coupla dudes up into the nosebleed seats to try and ferret out another Crystal Skull as well as some much-needed Gold.  I also put a jobber on the Red Tikal Track, hoping to leap him off at an opportune moment.  Jeremy's partial starvation also made me extra-paranoid, so I sent another minion into the field looking for a bushel of maíz.  Prior to this I'd already set aside two Stone and six Corn.  Sorry, but when it comes to my l'il meeples beggin' for table scraps I turn into Sally freakin' Struthers.  

Kris continued to out-Donald Trump the rest of us, snatching a dude off the second rung of the Tikal wheel in order to construct a duplicate Farm for one Wood.  On a subsequent turn he parleyed two Wood and one Stone into the first Civic Building of the game.  This structure gave him a one-up in the Resource Extraction Technology and a bonus Wood every time he earned that resource.  Despite his expenses, he still had three Gold and Two Wood left over at the end of this segment, along with a pair of Gold and Corn Harvest Tokens.  

If anything, you certainly can't accuse Andrew of failing to recognize a successful strategy.  In the race to get up Yaxchilan Mountain and steal more Skulls, two of his neckless goons trampled my poor lone Worker.  S'funny, I always thought those things were rare, but apparently they're as common as Pez if you know where to look for them.  Anyway, by the end of his turn Andrew had acquired two new Skulls, a Wood and one permanently-stuffed Worker thanks to his new Farm.  With the Skulls burning a hole in his loincloth, Andrew plopped a Worker down on the Blue Chichen Itza rondel and kept him in place until his previous Victory Point reward was eclipsed.

  
The voracious appetite of Jeremy's platoon of Workers continued to be a liability, seriously hampering his development.  In an effort to produce more nachos, one of Jeremy's peeps hopped on the Tikal rondel for a much-needed one-point advancement in Agri-Tech.  He also managed to score a Victory Point by disembarking a flunky on the Uxmal roundel and edging one step up towards Kukulcan's temple.  In an attempt to stockpile some badly-needed supplies, he also sent some henchmen for a spin on the Palenque and Yaxchilan Tracks, netting three Wood, a Stone, a Gold and another Wood Harvest Token.

My plucky little explorer dropped his skeletal payload on the eight Victory Point space in Chichen Itza.  Woot!  Unfortunately, that was pretty much the highlight of my next few turns.  I took a couple of rides on the ol' Yaxchilan merry-go-roundel, getting a second Wood Harvest Token and a few bushels of Corn.  I also kept a guy on the Tikal wheel long enough to earn a one-pip advancement in Agriculture.  Yay for bonus ears of Corn!

Kris kept plugging away, trying to optimize every turn and every action.  Already well-stocked for sustenance, he set his eye on some advanced developments, placing a Worker on the Tikal path and carefully reviewing the available Monuments.  To ensure that he had all the required building materials, he gave one of his peons a pick axe and a tin pan and then pointed towards the summit of Yaxchilan.  He also sent a worker to the Uxmal markets, hoping to translate a few timely, god-pleasing offerings into some permanent production perks.      

Andrew discovered Gold up in them thar Yaxchilan hills.  He also got some corny grist from the Palenque mill, earning his first Corn Harvest Token in the process.  He also kept crawling on his hands and knees up the steps of Kukulcan's Temple via some Uxmal Track ass-kissery.  In addition to a chunk of Victory Points, Andrew also earned a free toaster...er Crystal Skull for all of his dedication and devotion.  Even though he was sniping a ton of in-game points, would he have enough to withstand Kris's long-term development plans?


After Jeremy was forced to beg for Corn, he immediately lost favor in the eyes of the Great Plumed Serpent and his Victory Point score dipped into the negatives.  He quickly roared back with several trips up the Palenque Track, which finally gave him a surplus of chow and yet another Corn Harvest Token.  With his economy finally getting off the ground, he dispatched several developers to Tikal, setting himself up for some potential construction during the end game.

I worked my ass off on the next few turns, locating and then dropping a new Skull on the Chichen Itza promenade in order to curry favor with Chaac, the Mayan rain deity.  After some additional sacrifice and prostration via the Uxmal track, Captain Lightning Axe finally rewarded me with a modest windfall of Victory Points and the gift of Stone.  I then parleyed a successful Gold-prospecting expedition in Yaxchilan into a dual-purpose Shrine to Chaac and Kukulcan.  Hey, why put all of your prayer eggs in one divine basket?  Digging the bonus Corn provided by my Technology upgrade, I turned the Tikal rondel into a Tilt-A-Whirl, scoring similar advances in Resource Management, Architecture and Theology.  At the last minute I noticed that the cupboard was bare so I chucked a few Workers on the Palenque wheel to generate a theater-sized tub of popcorn and a matching Harvest Token.  Whew!

After spending the previous turns patiently laying the foundations, Kris made a few key acquisitions.  Armed with a slew of resources, his minions went to work, investing two Gold and one Stone in a Shrine that gave him a Tech upgrade in both Resource Extraction and Architecture.  Thanks in part to these bonuses, he built another Shrine for three Gold which gave him a two-step boost towards the apex of Quetzalcoatl's Temple.  All the while he maintained a symbiotic level of resource replenishment, finishing his turn with a stockpile of four Gold, two Wood and four Stone.

Continuing with his "Hey, if it ain't broke, don't fix it" philosophy, Andrew stockpiled Crystal Skulls like they were Happy Meal Toys.  He littered two more of them around in Chichen Itza, earning a slew of Victory Points and nigh-penultimate approval from Kukulcan.  When he wasn't aggressively brown-nosing the serpent god, Andrew was intent on resource management and long-term planning.  He ended the next Food Day phase with two Wood, one Gold, and a smattering of leftover Corn.  Even better, he still had three Workers optimally placed on the Palenque, Tikal and Chichen Itza roundels.       


The last few rounds were pretty intense.  Jeremy crawled out of his Victory Point deficit by purchasing a Shrine for two Stone and making nicey-nicey with Chaac.  He also picked up a very handy Monument which promised an end-game wad of Victory Points for each one of his Workers.  All of those hungry mouths might pay off for him after all!  To ensure that history would never repeat itself (and earn some eleventh hour Victory Points) he sent his entire contingent of Workers out on the Palenque path, acquiring twenty-five bushels (!) of Corn, two Wood, another Wood Harvest Token and and three more Corn Harvest Tokens.  Unfortunately he ran out of time before he could place his first and only Crystal Skull acquisition.    

Thanks to my Tech advances I finally stopped worrying about food production and snapped up two Green Civic Buildings.  The first cost me two Wood and one Stone and gave me a +1 bump in Resource Extraction, earning me a bonus for those same two resources.  This let me gather up the three Wood and one Stone required for my next build in record time.  Not only did this second Green Civic Building give me yet another Tech boost in the same category ("Yay!  Bonus Gold!") I also got six free Corn out of the deal, finally silencing my irrational fear of mss Worker starvation.  Just as the game was about to wrap up I acquired a Monument for two Wood, three Stone and one Gold which promised four game-end Victory Points for every one of my Green structures.  That left me with two Gold and two Wood as well as one Corn and three Wood Harvest Tokens.

Kris retained a laser-like focus on his end-game strategy.  For two Gold and one Wood he snared a Tomb which immediately earned him eight Victory Points.  Suddenly Andrew's lead was shrinking!  He then broke the bank, spending three Stone and three Gold for a highly-prized Monument which offered a slew of Victory Points for his best Temple step advancement.  Naturally he picked Quetzalcoatl's crib, where he'd managed to make it to the second-last space.

Ever-steady Andrew altered his course slightly when he suffered a contagious bout of Food Day paranoia.  After sending a few workers into Palenque field to look for spare Wood and Corn he finally broke down and bought his second Building of the game for two Wood, which made one of his Workers immune from hunger.  Even after all of this he still had a modest surplus of five Corn, one Stone, one Gold, and a late-arriving Corn Harvest Token.  From there on in, he was free to drop two more Crystal Skulls in the now-cluttered environs of Chichen Itza for a borderline obscene end-game Victory Point total of 44.  


END-GAME VICTORY POINT TALLY 

Andrew...44
Kris...19
Me...13
Jeremy...0

FINAL TEMPLE VICTORY POINTS

Kris...20
Andrew...18
Me...9
Jeremy...4

 VICTORY POINTS FOR CONVERTED RESOURCES

Jeremy...10 
(2 Wood and 25 Corn + 3 VP's for a Crystal Skull)
Andrew...3
(5 Corn, 1 Gold and 1 Stone)
Me...3
(2 Gold, 2 Wood and 1 Corn)
Kris...0

VICTORY POINTS FROM MONUMENTS

Kris...18
Jeremy...18
Me...12
Andrew...0

***

FINAL SCORES

Andrew...65


Kris...57


Me...37


Jeremy...32


***
OBSERVATIONS

Based on most worker-placement games, Jeremy's plan to recruit new Workers ASAP was sound in theory.  Unfortunately he quickly got undone by their diva-like Corn demands.  Fortunately he rallied nicely at the end, nabbing some key resources as well as the best possible Monument to dovetail with his inadvertent game plan.

My strategy could best be described as "Hey, let's throw this at the wall and see if it sticks".  Although I was motivated by a Corn feeding frenzy at first, I soon flirted with Andrew's Skull tactic and then  pulled the Green Building Victory Point Monument thing out of my ass at the last second.  The most complimentary thing I can say about my effort is that it was scattered and experimental, designed to test the boundaries of the rule set.


Kris played a very solid game, highlighting improved efficiencies and quick access to construction materials in order to build post-match Victory Point buildings.  Marry this with a pious devotion to Quetzalcoatl and we're left with a pretty balanced effort.  Indeed, if he'd just managed to get one more matching Monument out it probably would have swung the game in his favor.

Like a villain from an Indiana Jones flick, Andrew did nothing but steal Skulls from their proper resting place and then use them to kiss ass with the Gods.  Annoying as fuck, but, hey, it worked.

***

REVIEW

Pros  
  • The game is a triumph of production design.  The board art is gorgeous, the iconography is evocative, the color selections are intuitive and the Building and Player Boards are high-quality.  The tableau is pleasant to look at and the components are great to handle.  Plus: Crystal Freakin' Skulls - ZOMG!!!
  • The roundels actually feel like an organic and logical part of the game.  In other words, they aren't just a gimmicky tack-on.  Timing Worker removal from the wheel is a fascinating and original dilemma that I've never experienced in a game before.   
  • For the sake of full disclosure, Kris had played the game before and Andrew had prepped the rules but Jeremy and I went into this one completely stone cold.  I think I can safety speak for him when I say that the sheer wealth of options presented to players on any given turn can be somewhat baffling.  As a result, analysis paralysis can sometimes creep in.  Having said that, it feels downright churlish to criticize a game for presenting too many choices.  
  • Once again, we get another game with a myriad of strategies and a debate as to which ones are  most valid.  Even though Andrew's "plunder n' plop" Skull tactic was formidable, all Kris really needed was another relevant Monument and the final score might have been a lot different.  
  • For a Euro, the Aztec theme of Tzolk'in: The Mayan Calendar comes through like a clarion call.
  • The turns fly by very quickly.  At no point did I ever feel preoccupied or disengaged.
  • I haven't stopped thinking about this game since I played it and that's always a good sign.  
Cons
  • The game has some fiddly rules that are easy to miss and the myriad of sometimes-abstract iconography can result in the commonly heard table-refrain "What does this one do again?"  Of all the games I've played recently, this one really cries out for some one-sheet Player Aids.  
***

Whenever I encounter a game as good as Tzolk'in: The Mayan Calendar my immediate impulse is to dump my entire collection so that I can dedicate all of my time to practicing this new obsession.  This one virtually demands that you test its parameters in an effort to determine whether or not it's as dense and brilliant as that first play might suggest.  It's the board game equivalent of a drill sergeant yelling in your face, demanding that your soft, flabby brain get better at it, PRONTO.  

At face value, Tzolk'in: The Mayan Calendar is game enough for anybody.  


***

Looking to ass-kiss a bigger snake then your real-life boss?  Click on the image below to order Tzolk'in: The Mayan Calendar and help support this blog!